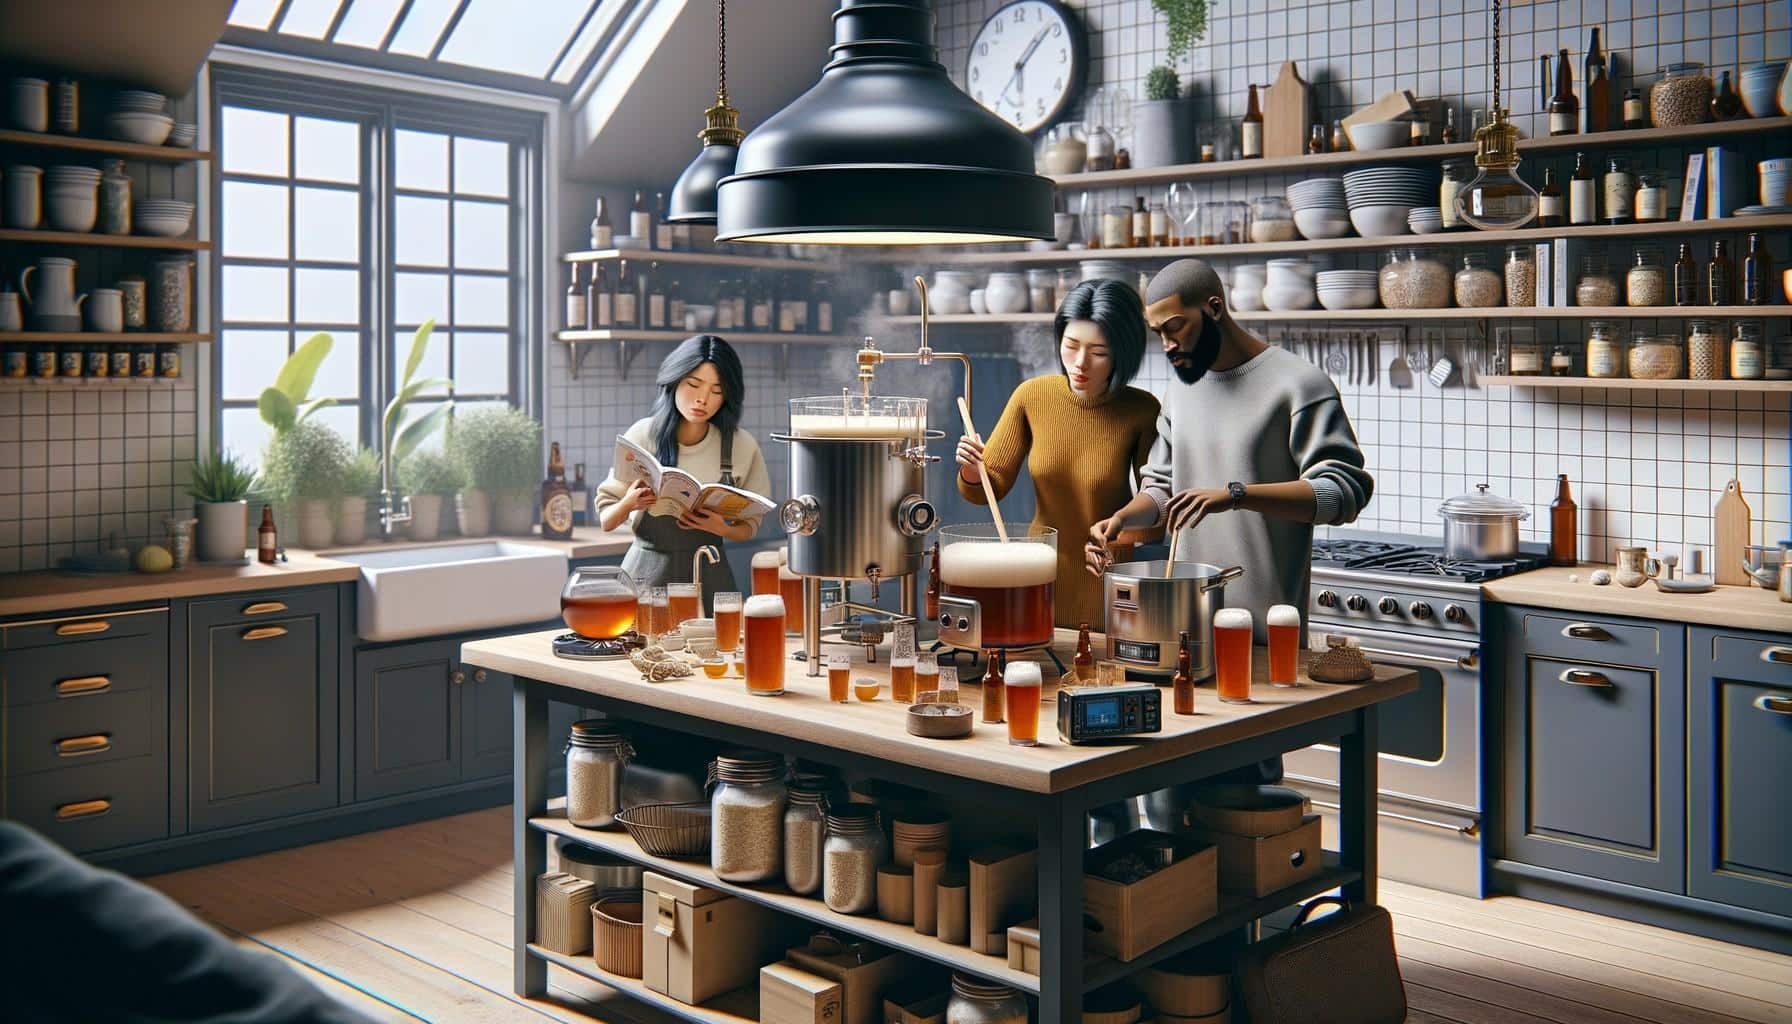
Home brewing transforms your kitchen into a craft brewery with the right knowledge and techniques. We at Home Owners Association know that mastering these home brew tips makes the difference between average beer and exceptional brews.
Temperature control, proper sanitisation, and quality ingredients form the foundation of successful brewing. These fundamentals separate amateur attempts from professional-quality results.
Essential Equipment and Ingredients for Home Brewing
What Equipment Do You Actually Need
Your brewing setup requires five essential pieces: a fermenting bucket with airlock, hydrometer, thermometer, siphoning tube, and sanitiser. Skip expensive starter kits that include unnecessary items. The American Homebrewers Association reports that 75% of first-time brewers find basic kits beneficial, but experienced brewers recommend you build your own collection.
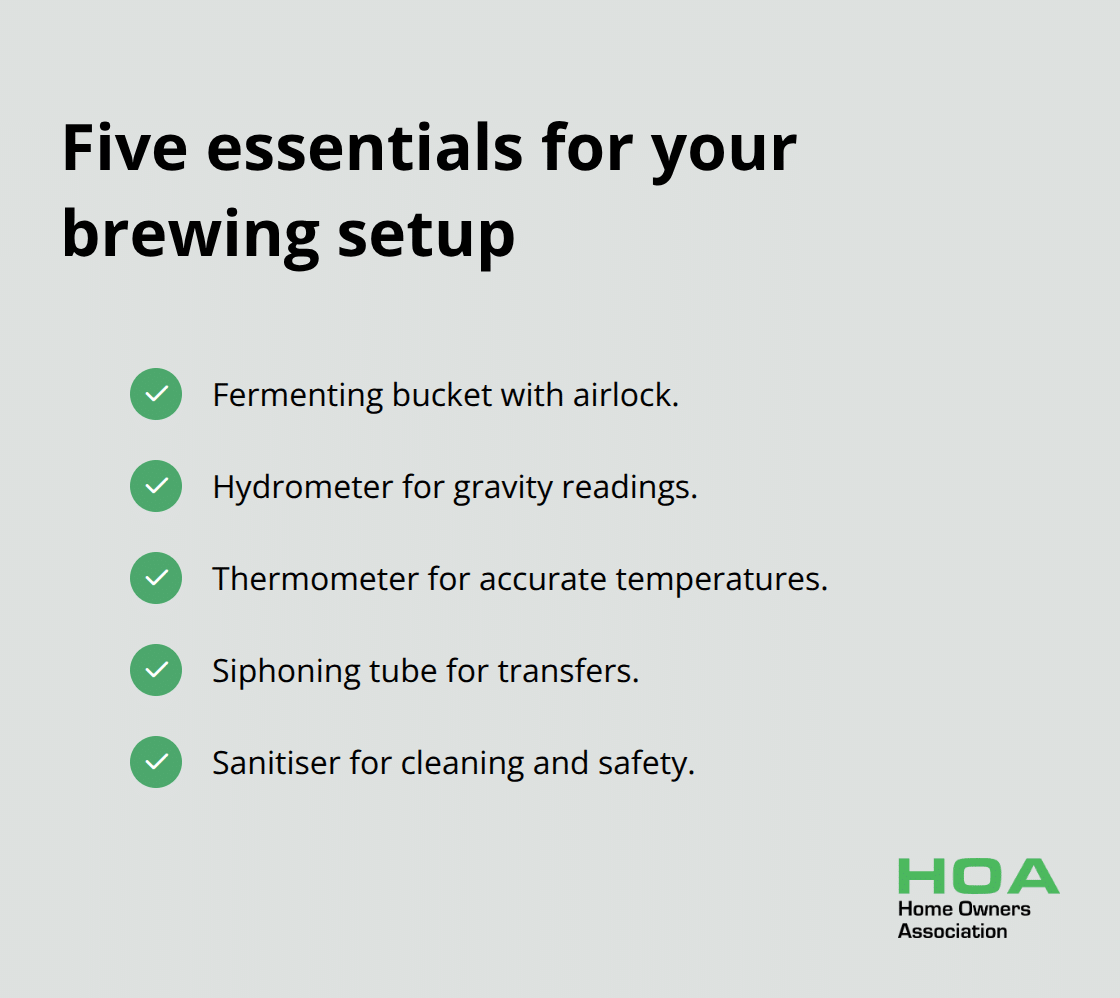
A 6.5-gallon food-grade plastic bucket costs around $15 and works better than glass carboys for beginners. Digital thermometers provide accuracy within 0.1 degrees, which matters when fermentation temperatures affect your beer’s final flavour profile.
Fresh Ingredients Make the Difference
Quality malt extract should smell sweet and appear light amber without dark spots or clumps. Whole grain malts stay fresh for 12 months when you store them properly, while pre-crushed grains lose potency within 6 weeks. Hops deteriorate rapidly after you open them – vacuum-sealed packages maintain alpha acid levels that directly affect bitterness. The Brewers Association emphasises you use hops within 3 months of opening for optimal aroma. Liquid yeast strains like those from White Labs produce cleaner fermentation than dry alternatives, though they require temperature control during shipment and storage.
Sanitisation Prevents Brewing Problems
Star-San sanitiser kills bacteria and wild yeast within 30 seconds of contact without rinsing required. Mix one ounce per five gallons of water and spray every surface that touches your beer. Proper cleaning and sanitation ensures healthy fermentation and safe beer production. Replace plastic equipment annually since scratches harbour bacteria that sanitisers cannot reach. Glass and stainless steel last indefinitely with proper care (though they cost more upfront). Heat sanitisation at 180°F for 20 minutes works but risks damage to plastic components and takes longer than chemical methods.
Water Quality Sets Your Foundation
Your tap water affects every aspect of your beer’s final taste. Most municipal water contains chlorine that kills yeast and creates off-flavours – carbon filters remove these chemicals effectively. Test your water’s pH levels (aim for 5.2-5.6 during mashing) and mineral content before you start. Hard water works well for hoppy styles like IPAs, while soft water suits lighter beers. Distilled water gives you complete control but requires mineral additions for proper yeast nutrition.
Once you master these equipment basics and ingredient selection, the actual brewing process becomes your next challenge.
Step-by-Step Brewing Process
Mash Extraction Maximises Sugar Conversion
Extract brewing simplifies your process while all-grain mashing gives you complete control over sugar extraction. Heat your strike water to 168°F, then mix with crushed grains to reach 152°F for optimal enzyme activity. The American Society of Brewing Chemists employs quality control parameters to evaluate the physicochemical properties of mash temperature and fermentable sugar composition.
Maintain temperature within 2 degrees – use towels or a heating pad for insulation. Test your mash with iodine drops; purple indicates incomplete conversion while yellow-brown shows readiness. Sparge with 170°F water to rinse remaining sugars, collecting 6-7 gallons for a 5-gallon batch. Your pre-boil gravity should hit 1.040-1.050 for most beer styles.
Temperature Control Determines Fermentation Success
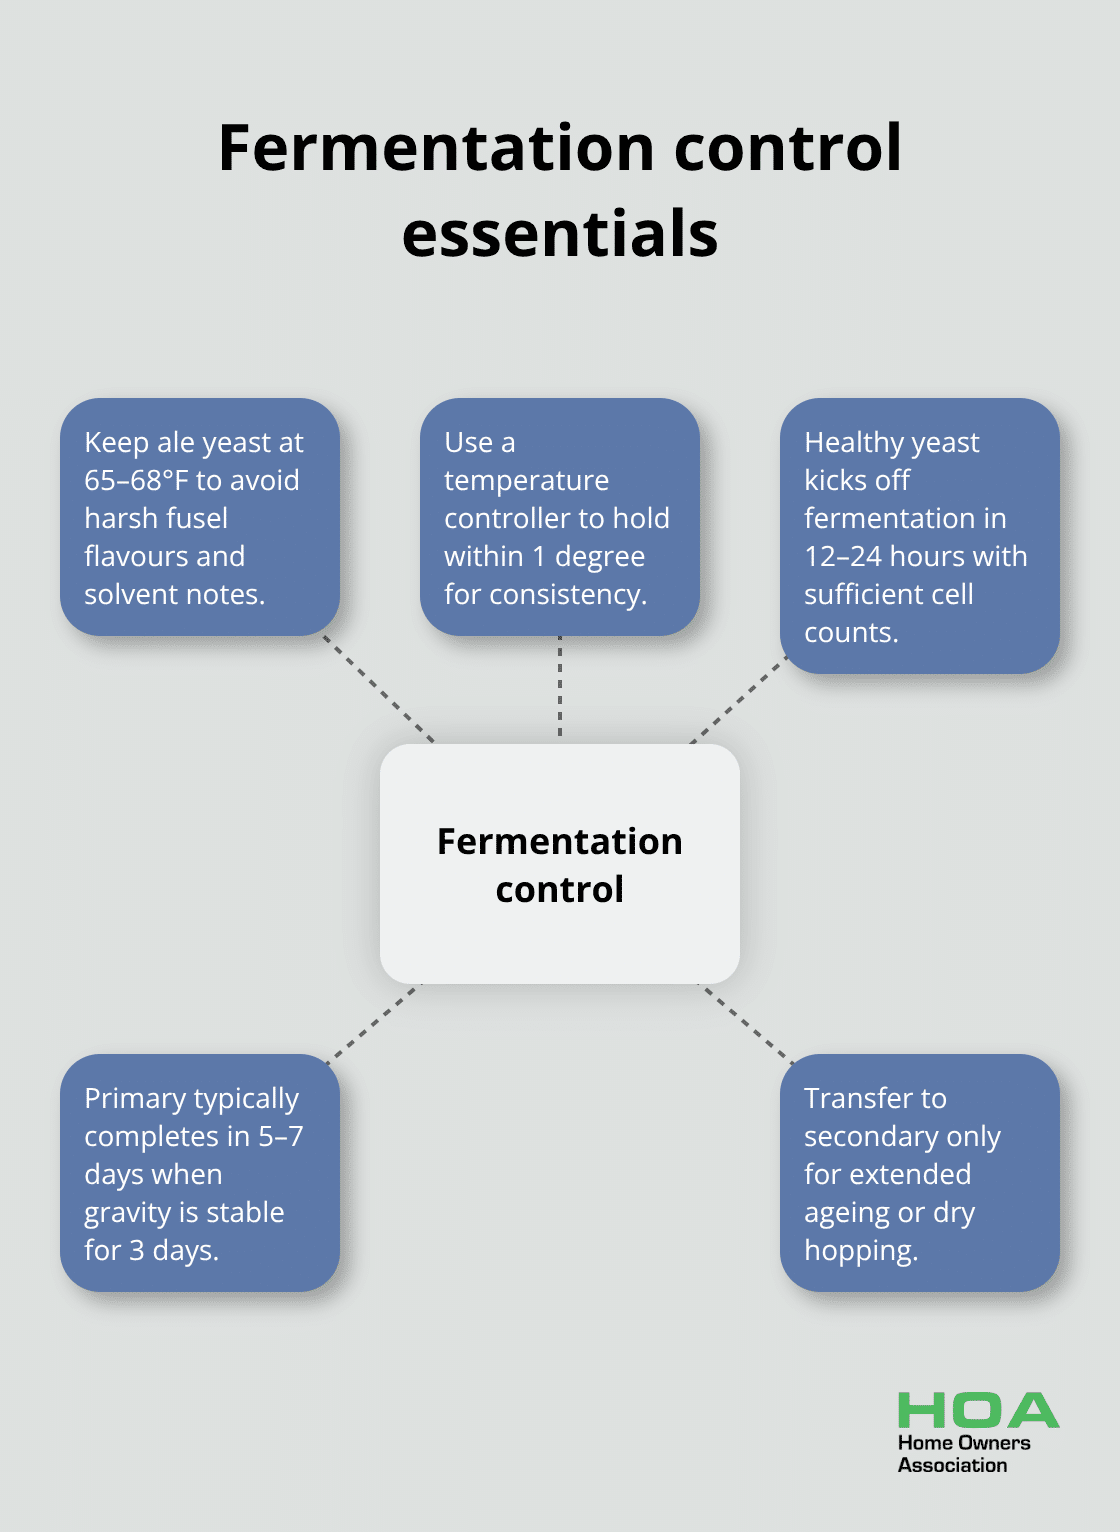
Ale yeast performs best between 65°F and 68°F – higher temperatures create fusel alcohols that taste harsh and solvent-like. Install a temperature controller with heating and cooling elements for precise control within 1 degree (digital controllers in the $50–$150 range provide excellent value for homebrewers). Fermentation starts within 12-24 hours with healthy yeast populations above 200 billion cells per 5-gallon batch.
Primary fermentation completes in 5-7 days when gravity readings stay constant for 3 consecutive days. Transfer to secondary fermentation only for extended ageing or dry hopping – most beers finish perfectly in primary fermenters without additional steps.
Bottling Calculations Create Perfect Carbonation
Calculate priming sugar based on beer temperature and desired carbonation levels – use 3.5 ounces of corn sugar for 5 gallons at 2.4 volumes CO2. Mix priming sugar with 2 cups boiling water, cool completely, then add to your bottling bucket before you transfer beer.
Fill bottles leaving 1.5 inches headspace and cap immediately. Store bottles at 70°F for 2 weeks minimum – carbonation develops through continued yeast activity. Cold conditioning at 35°F for another week improves clarity and flavour integration (though some styles benefit from longer conditioning periods).
Even perfect technique can fail when common mistakes sabotage your brewing efforts.
Common Mistakes and How to Avoid Them
Temperature Swings Destroy Beer Quality
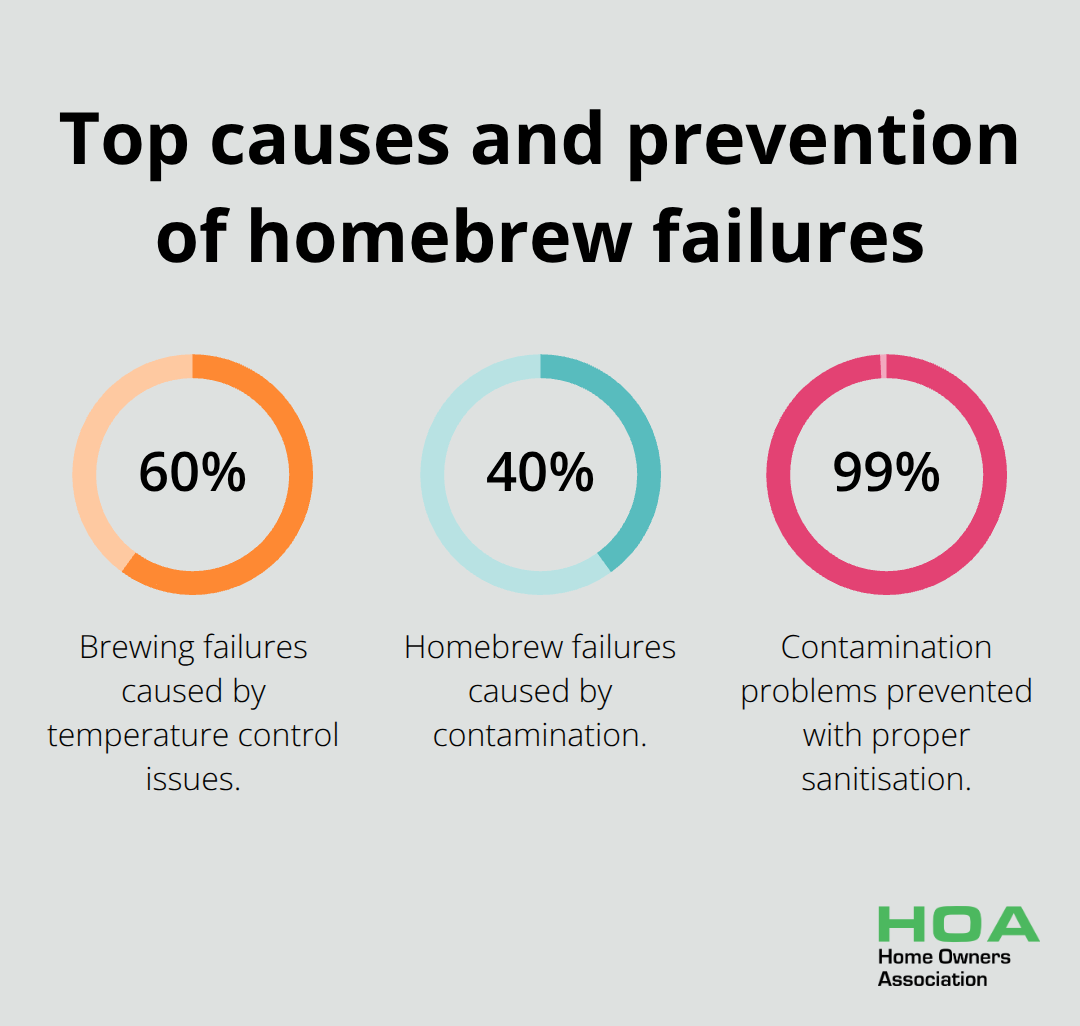
Temperature swings kill more homebrew batches than any other factor. Fermentation temperatures above 72°F produce fusel alcohols that create harsh, solvent-like flavours that you cannot fix. Temperature drops below 62°F slow yeast activity and create incomplete fermentation with residual sweetness. The American Homebrewers Association found that 60% of brewing failures stem from temperature control issues.
Invest in a fermentation chamber or temperature controller – basement corners and closets experience daily temperature swings of 10-15 degrees that destroy beer quality. Check your fermenter temperature twice daily during active fermentation, not room temperature. Digital controllers maintain precise temperatures within one degree (essential for consistent results).
Contamination Signs You Cannot Ignore
Wild yeast and bacteria contamination creates off-flavour within 48 hours of infection. White pellicles that float on beer surfaces indicate wild yeast contamination that produces sour, funky flavours. Green or black mould growth requires immediate batch disposal – never taste contaminated beer.
Sanitise everything that contacts your beer after the boil, including your hands, bottle caps, and siphon tubes. Replace plastic equipment annually since microscopic scratches harbour bacteria that Star-San cannot reach. The Brewers Association reports contamination causes 40% of homebrew failures, yet proper sanitisation prevents 99% of these problems.
Fermentation Timing Determines Final Quality
Under-fermented beer tastes sweet and develops bottle bombs from continued fermentation pressure. Take gravity readings three consecutive days – fermentation completes when readings stay identical. Most ales finish in 7-10 days, but rushed batches lead to diacetyl production that creates buttery off-flavours.
Over-fermentation rarely occurs with proper yeast health, though extended contact with yeast sediment creates autolysis that produces meaty, soy sauce flavours after 4-6 weeks. Transfer beer off yeast sediment when primary fermentation completes to prevent these issues. Cold crash at 35°F for 48 hours before bottling to improve clarity and reduce sediment in finished bottles.
Final Thoughts
Mastering home brewing demands dedication to three fundamental principles: temperature control, proper sanitisation, and quality ingredients. These home brew tips form the foundation that separates exceptional beer from mediocre attempts. Temperature swings above 72°F or below 62°F destroy batches through off-flavour production, while contamination from poor sanitisation ruins 40% of homebrew attempts according to the Brewers Association.
Your brewing journey improves through consistent practice and detailed record-keeping. Track gravity readings, fermentation temperatures, and timing for each batch. Join local homebrew clubs for feedback and mentorship opportunities that accelerate your learning curve (experienced brewers provide invaluable guidance for troubleshooting problems).
Simple recipes often produce better results than complex formulations. Focus on perfecting basic techniques before you experiment with advanced methods or unusual ingredients. We at Home Owners Association support homeowners in all their projects, and our members can visit Home Owners Association to learn how membership benefits your brewing setup and other home projects.