At Home Owners Association, we understand the appeal of a well-designed timber sleeper retaining wall. These structures not only add charm to your landscape but also serve a practical purpose.
Our timber sleeper retaining wall design guide will walk you through the process, from selecting the right materials to constructing a sturdy and attractive wall. Whether you’re a DIY enthusiast or planning to hire a professional, this guide will equip you with the knowledge to create a beautiful and functional addition to your property.
What Timber Sleepers Are Best for Retaining Walls?
At Home Owners Association, we know that selecting the right timber sleepers can make or break your retaining wall project. Our guide will help you choose the best materials for a sturdy and long-lasting structure.
Hardwood vs. Softwood Sleepers
Hardwood sleepers, such as jarrah, ironbark, and spotted gum, offer superior strength and natural resistance to decay and termites. These Australian natives are excellent choices for retaining walls. Softwoods like treated pine are more affordable but may not last as long as hardwoods.
Research published in 2016 found that creosote-treated wooden sleepers can last up to 40 years on average, making them a durable and long-lasting option for retaining walls.
Treatment Options for Longevity
Proper treatment is essential to ensure your timber sleepers withstand the elements. Look for sleepers treated to H4 level for in-ground use. This is the first level of treatment that is suitable for use in applications where the timber is in contact with ground or is continually exposed to moisture.
The Australian Wood Preservation Manufacturers Association confirms that H4 treated timber suits severe decay hazard situations, including ground contact.
Sizing Your Sleepers
The size of your sleepers depends on the height and length of your retaining wall. Use sleepers with a minimum thickness of 75mm for walls up to 1 meter high. For taller walls, consider 100mm or 125mm thick sleepers.
A University of Western Australia study found that increasing sleeper thickness by 25mm can improve wall stability by up to 30%.
Sustainable Choices
If environmental impact concerns you, look for sleepers certified by the Forest Stewardship Council (FSC) or Programme for the Endorsement of Forest Certification (PEFC). These certifications ensure the timber comes from responsibly managed forests.
The Australian Forestry Standard reports a 20% increase in certified timber products over the past five years, indicating a growing trend towards sustainability in construction materials.

Cost Considerations
While hardwoods may have a higher upfront cost, their longevity often makes them more cost-effective in the long run. For example, jarrah sleepers might cost 30-40% more than treated pine initially, but their extended lifespan can result in savings over time.
Now that you’ve selected the best timber sleepers for your project, it’s time to move on to the planning phase of your retaining wall. The next section will guide you through assessing site conditions, determining wall dimensions, and obtaining necessary approvals.
How to Plan a Timber Sleeper Retaining Wall
Assess Your Site
Planning a timber sleeper retaining wall starts with a thorough site assessment. Soil type plays a key role in wall design. Key characteristics of Group G soils include sandy topsoil, which typically requires less robust retaining wall structures due to good drainage properties.
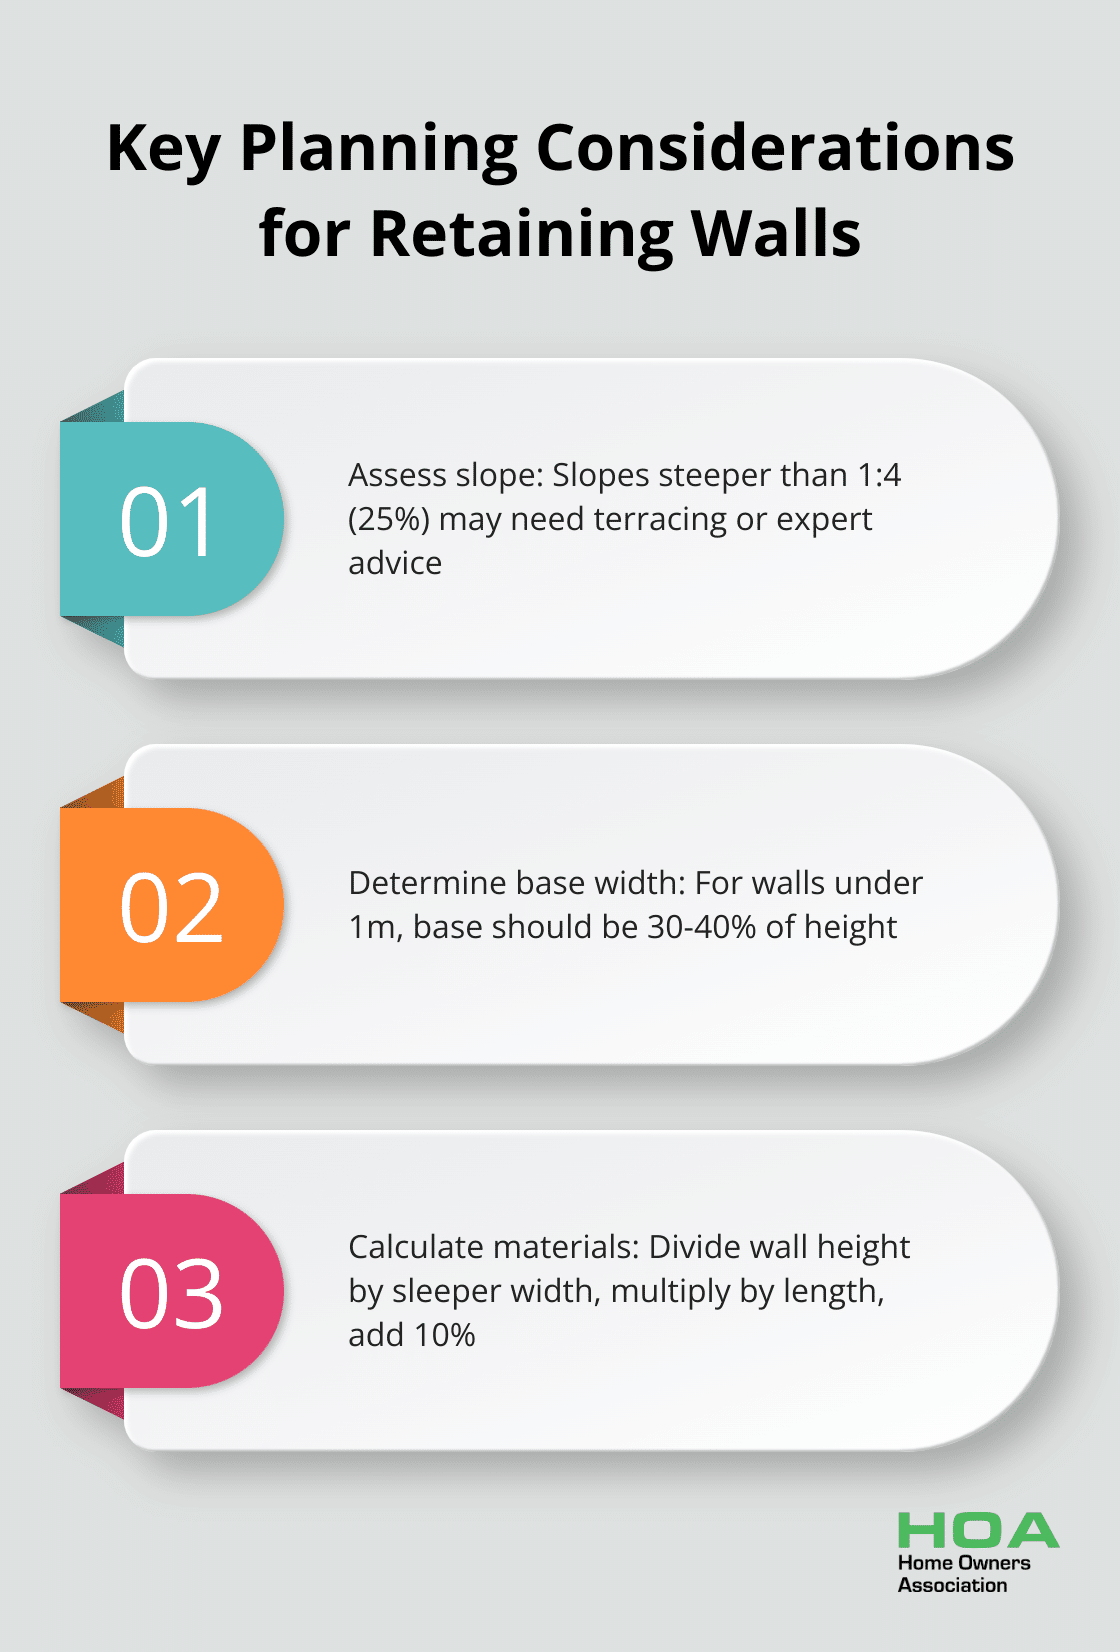
Slope measurement is essential. Use a clinometer or smartphone app to determine the gradient. For slopes steeper than 1:4 (25%), consider terracing or seek professional advice.
Don’t overlook underground utilities. Contact Dial Before You Dig, a free national referral service, to locate underground pipes and cables before you start digging.
Determine Wall Dimensions
Your site’s specific needs dictate the height and length of your wall. Most local councils in Australia require approval for retaining walls over 1 meter in height. For walls under this height, try to make the base width at least 30-40% of the height.
To determine length, measure the area you need to retain and add an extra 10% for curves or corners. Longer walls may require expansion joints every 4-6 meters to prevent cracking due to thermal expansion.
Calculate Materials
To determine the number of sleepers needed, divide the wall height by the width of your chosen sleepers, then multiply by the wall length. Add 10% for wastage and cuts.
For example:For a 10-meter long, 1-meter high wall using 200mm wide sleepers:(1m / 0.2m) x 10m = 50 sleepers50 + 5 (10% extra) = 55 sleepers needed
Include posts in your calculations – typically, you’ll need one every 1.2 to 1.8 meters (depending on wall height and soil conditions).
Obtain Necessary Approvals
Building regulations in Australia vary by state and local council. Generally, you’ll need approval for walls over 1 meter high or those close to property boundaries or structures.
Contact your local council’s planning department early in your process. They can provide specific guidelines and help you avoid costly mistakes. Some councils may require engineer-certified designs for taller walls.
With your site assessed, dimensions determined, materials calculated, and approvals obtained, you’re ready to move on to the construction phase. The next section will guide you through the step-by-step process of building your timber sleeper retaining wall.
How to Build a Timber Sleeper Retaining Wall
Prepare the Ground
Start by marking your wall’s location with string lines and stakes. Excavate the area and dig a trench about 100mm deeper than your first sleeper’s width. Make the trench wide enough to fit your sleepers plus an additional 200mm for backfill.
Use a spirit level to ensure a perfectly level base. Compact the soil with a plate compactor, then add a 100mm layer of crushed rock or gravel. Compact this layer as well. This base is essential for stability and drainage.
Install the First Row
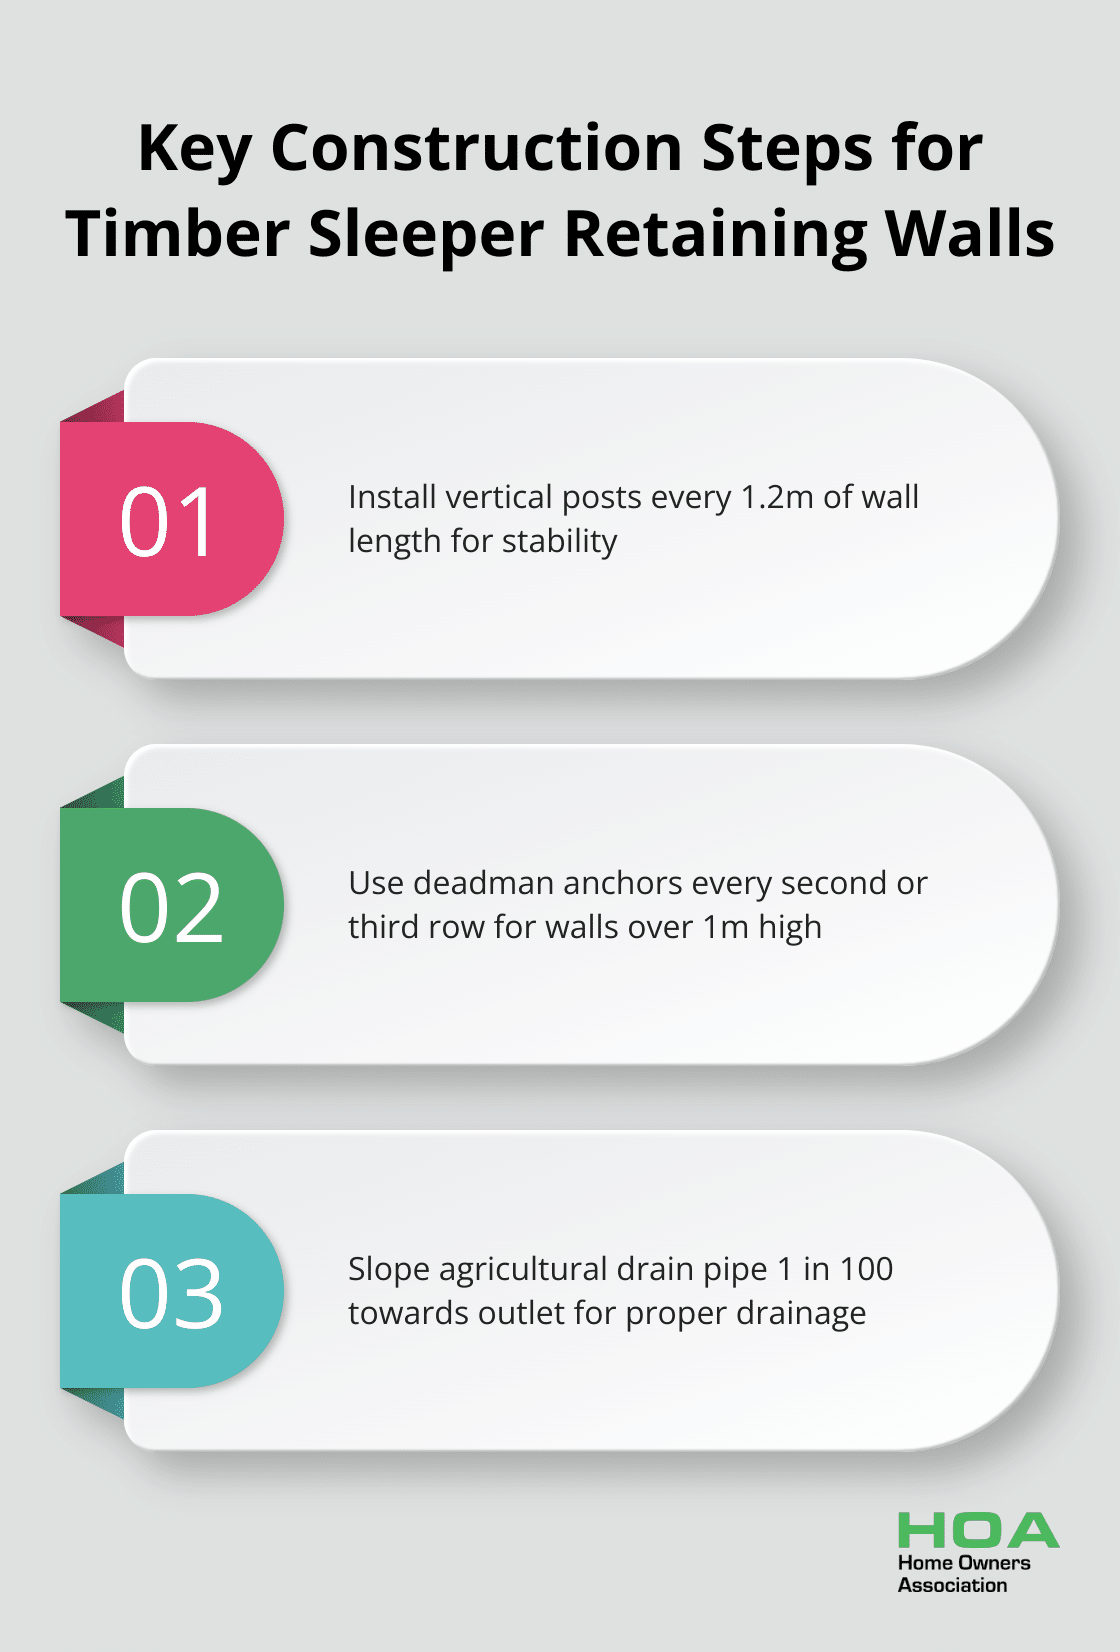
Place your first sleeper in the trench. Ensure it’s level both horizontally and vertically. Use a spirit level to check. If you’re using vertical posts, install these now. Dig holes at least 600mm deep for every 1.2m of wall length. Set the posts in concrete and allow it to cure before continuing.
Use galvanized steel brackets to secure the first row of sleepers to the posts for the best results. This method increases wall stability significantly. Steel posts help keep your sleeper walls straight, level and stable, which is key to preventing failure.
Build Up the Wall
Add subsequent rows and stagger the joints between sleepers for added strength. Use galvanized screws or bolts to secure each row to the one below. Pre-drill holes to prevent splitting.
For walls over 1m high, consider using deadman anchors (additional timbers buried perpendicular to the wall, providing extra support). Install these every second or third row.
Manage Drainage and Backfilling
Install an agricultural drain pipe along the base of the wall to prevent water buildup. Slope it 1 in 100 towards a suitable outlet. Cover the pipe with gravel.
Backfill in layers, using a mix of gravel and soil. Compact each layer thoroughly before adding the next. This process, known as progressive backfilling, can increase wall stability. The experiment consisted of applying various vertical loads on the sleepers in static or dynamic conditions.
Add Finishing Touches
Consider adding a timber cap to protect the top of the sleepers from moisture. This can extend your wall’s lifespan.
You might want to stain or seal your timber for a polished look. However, be aware that some treatments can affect the timber’s natural ability to expand and contract. Always choose products specifically designed for outdoor use.
Landscape around your new wall to enhance its appearance and functionality. Plant shallow-rooted plants near the base of the wall to prevent soil erosion. However, avoid large trees or shrubs with invasive root systems that could damage the wall structure.
Final Thoughts
Our timber sleeper retaining wall design guide has equipped you with essential knowledge for your landscaping project. We’ve covered material selection, planning considerations, and construction techniques to help you create a durable and attractive wall. This comprehensive guide empowers both DIY enthusiasts and those working with professionals to make informed decisions throughout the process.
The success of your retaining wall project depends on careful planning and execution. Proper site assessment, material calculations, and adherence to local regulations will set a solid foundation for your wall. Attention to detail during construction, including ground preparation, secure fastening, and effective drainage, will ensure the longevity of your timber sleeper retaining wall.
For expert advice on home improvement projects and exclusive benefits tailored to the Melbourne market, consider joining the Home Owners Association. Our team provides trade pricing, discounts, and personalized guidance to help you achieve the highest standards of quality in your home projects. Transform your landscape with confidence using the insights from our timber sleeper retaining wall design guide.