
At Home Owners Association, we understand the importance of a well-maintained exterior for your property. Timber fascia not only enhances the aesthetic appeal of your home but also protects it from the elements.
Our timber fascia installation guide will walk you through the process, ensuring you have the knowledge to tackle this project with confidence. Whether you’re a DIY enthusiast or simply want to understand the process better, this comprehensive guide has you covered.
Preparing Your Timber Fascia Project
Essential Tools and Materials
To start your timber fascia installation, you’ll need a robust set of tools. These include:
- Circular saw or handsaw
- Drill with various bits
- Hammer
- Pry bar
- Sturdy ladder
- Measuring tape
- Level
- Pencil
For materials, select high-quality timber fascia boards suited to your climate. In Australia, hardwoods like spotted gum or ironbark are popular for their durability. You’ll also need galvanised nails or screws, wood preservative, and exterior-grade paint or stain.
Prioritising Safety
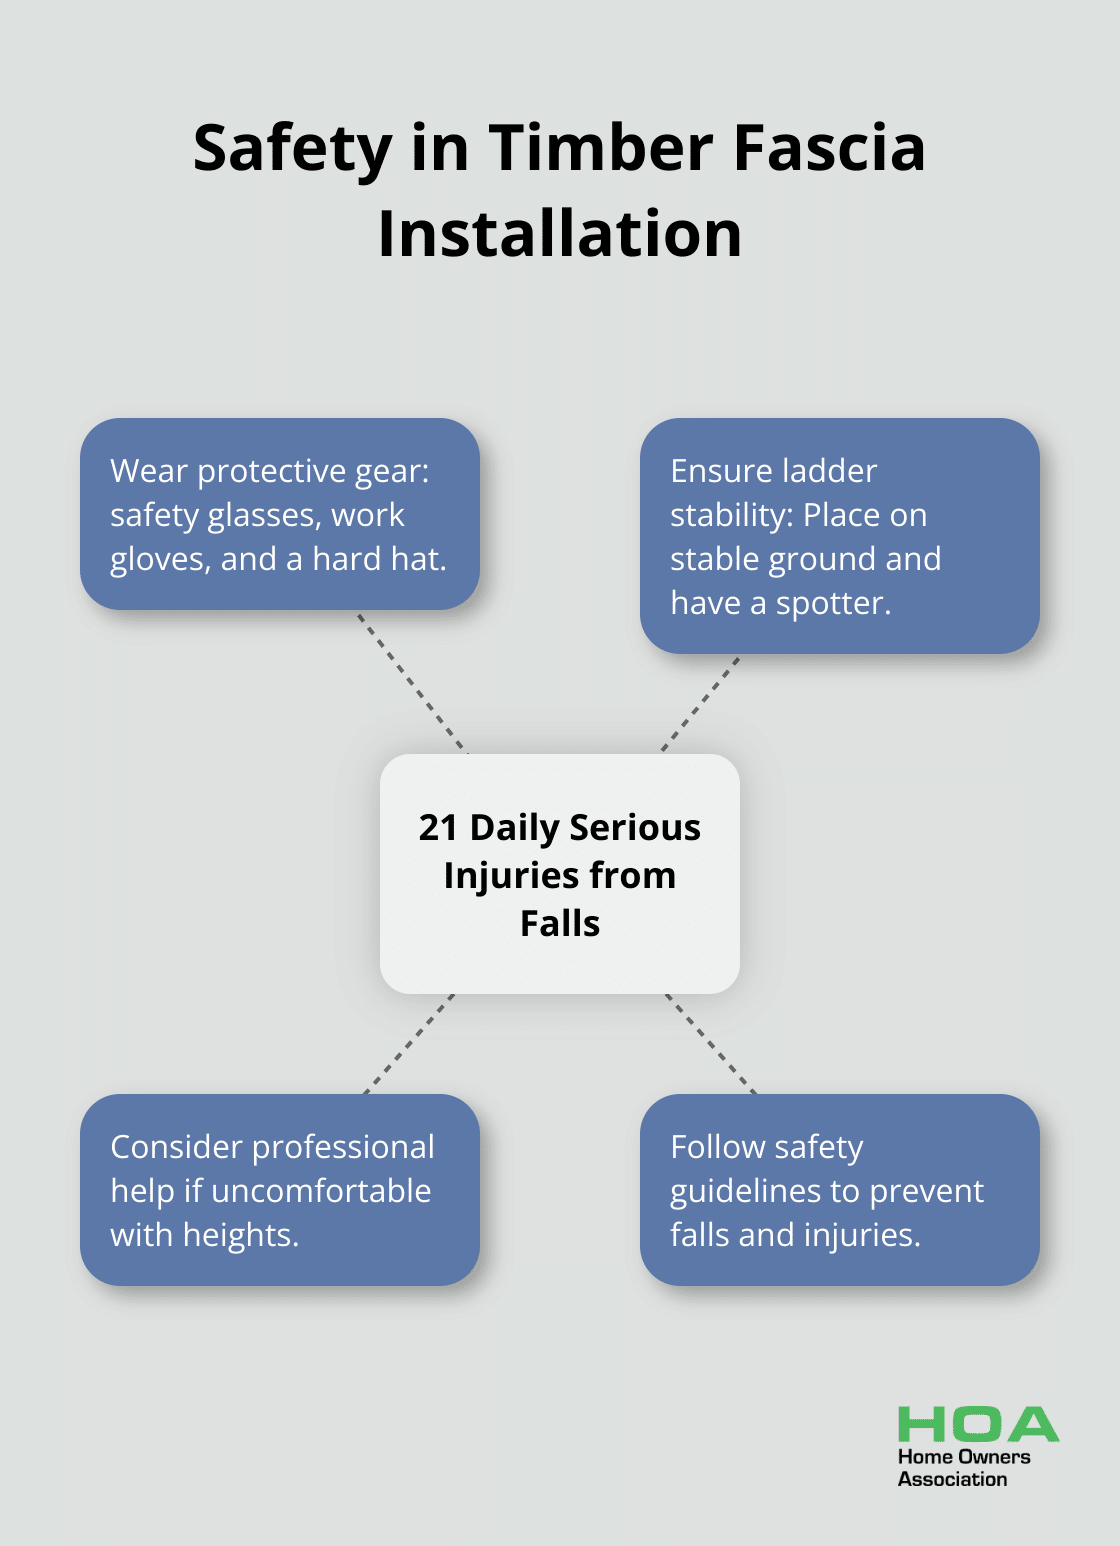
Safety should be your top priority. Wear protective gear including safety glasses, work gloves, and a hard hat. When using a ladder, ensure it’s on stable ground and have someone spot you. If you’re not comfortable working at heights, it’s best to hire a professional. Safe Work Australia reports that in 2010-11, 7730 claims for serious injury were lodged due to a fall from a height, which means 21 employees each day were seriously injured from falls, so take every precaution.
Precise Measurements and Cuts
Accurate measurements are essential for a professional-looking result. Measure the length of your roofline carefully, adding an extra 10% to account for waste and mistakes. When cutting, use a sharp blade in your saw to ensure clean cuts and prevent splintering.
For complex angles or joints, create a template first. This extra step can save you time and material in the long run. If you’re unsure about your measurements or cuts, consult with an expert. (Home Owners Association members can access expert advice for their projects.)
Preparing the Work Area
Clear the area around your house where you’ll be working. Remove any obstacles that might impede your movement or create safety hazards. Set up a stable work surface (such as sawhorses) for cutting and preparing your timber fascia boards.
Weather Considerations
Check the weather forecast before starting your project. Dry conditions are ideal for timber fascia installation. (Avoid working in wet or windy conditions, as this can affect the quality of your work and pose safety risks.)
With these preparations complete, you’re ready to move on to the actual installation process. The next section will guide you through removing the old fascia and installing your new timber boards.
Installing Your Timber Fascia
Remove the Old Fascia
Start the installation process by removing the existing fascia boards. Use a cat’s paw to dig the drip edge nails out and gently pry the drip edge away. Take care not to damage the roof tiles or underlying structure. If you find any rotted wood, remove it completely and check if the rafters need repair before you continue.
Install Backing Boards
Before you attach the new fascia, install backing boards. These provide additional support and help create a straight, even surface for your new fascia. Use treated timber for the backing boards and cut them to fit snugly between the rafters. Secure each board with galvanised nails or screws. Make sure they’re level and flush with the rafter ends.
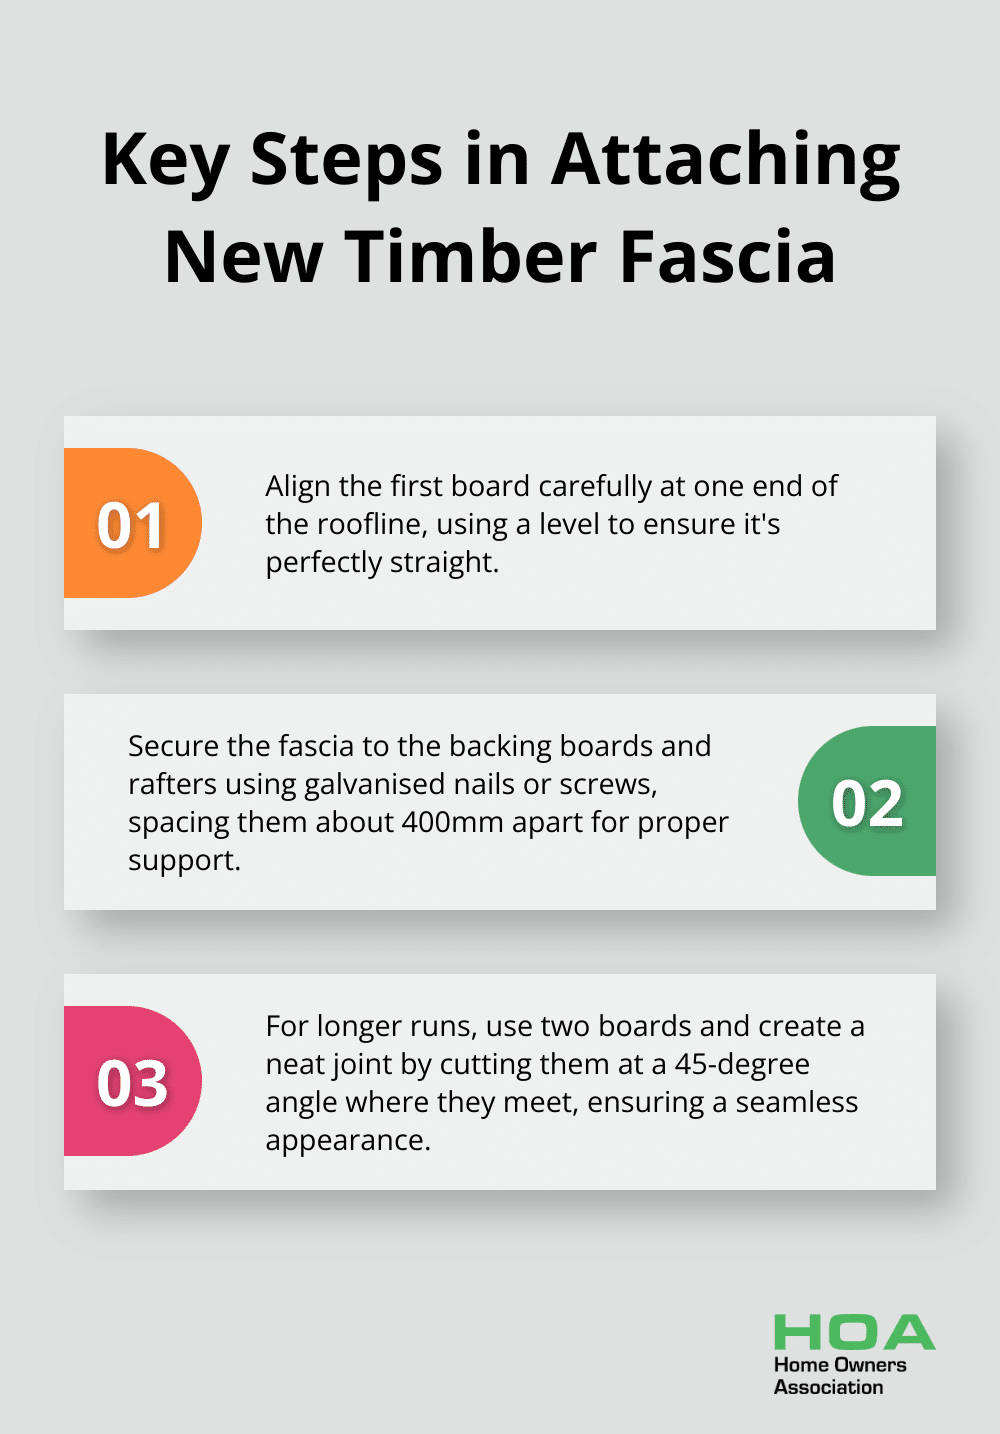
Attach the New Timber Fascia
Now it’s time for the main event – installing your new timber fascia. Start at one end of the roofline and align the first board carefully. Use a level to ensure it’s perfectly straight. Secure the fascia to the backing boards and rafters using galvanised nails or screws, spacing them about 400mm apart. (For longer runs, use two boards and create a neat joint by cutting them at a 45-degree angle where they meet.)
Seal and Paint
After you place all fascia boards, protect and beautify them. Apply a high-quality wood preservative to all exposed surfaces, including the cut ends. This step prevents wood rot, fungi, decay, and mould, extending the life of your fascia. After the preservative dries, apply an exterior-grade primer followed by at least two coats of your chosen paint or stain. This not only enhances the appearance of your fascia but also provides an additional layer of protection against the elements.
Ensure Proper Installation
Proper installation is key to the longevity and effectiveness of your timber fascia. If you’re unsure about any step in the process, consult with a professional. (Many homeowners find that expert advice can make a significant difference in the quality of their DIY projects.)
The next chapter will guide you through the essential maintenance and care practices to keep your newly installed timber fascia in top condition for years to come.
Keeping Your Timber Fascia in Top Shape
Regular Cleaning
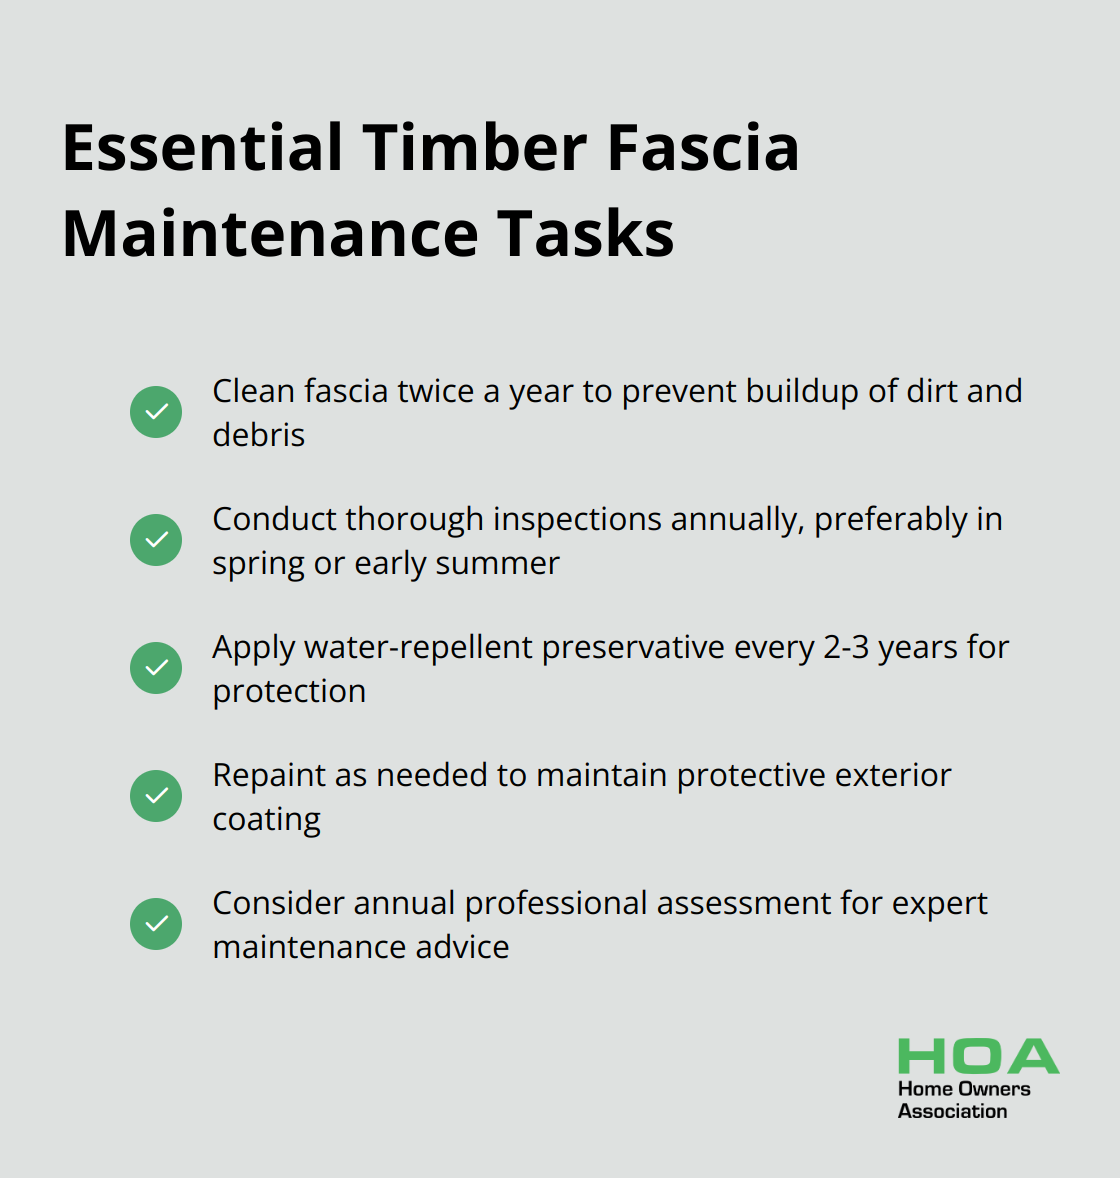
Clean your timber fascia at least twice a year to prevent the buildup of dirt, debris, and organic matter. Use a leaf blower on the lowest setting to remove loose debris, and scrub mould spots or dirt deposits with a soft-bristled brush dipped in a mixture of warm water and mild detergent. For stubborn stains, a solution of one part bleach to three parts water can be effective, but rinse thoroughly afterwards. Avoid high-pressure washers, as they can damage the wood fibres and compromise the fascia’s integrity.
Protective Measures
Repaint and reseal your timber fascia to protect it against the harsh Australian climate. Figures 5.1 and 6.1 give guidance on the definition of exposure to the weather. The durability of some timber species after more than 30 years exposure must also be acknowledged. Before repainting, inspect the surface for any signs of peeling or cracking. Sand these areas smooth and apply a primer before adding two coats of high-quality exterior paint.
For sealing, apply a water-repellent preservative every 2-3 years. This will help prevent moisture absorption and reduce the risk of rot and fungal growth. Apply the sealant on a dry day when no rain is forecast for at least 24 hours.
Thorough Inspections
Conduct thorough inspections of your timber fascia at least once a year, preferably in spring or early summer. Look for signs of damage such as cracks, splits, or areas where the wood has started to rot. Pay special attention to joints and end grain areas, as these are most susceptible to water infiltration.
Check for any gaps between the fascia and the roof or wall, which could allow water to penetrate behind the fascia. If you notice any issues, address them promptly to prevent further damage. Fill small cracks with exterior wood filler, while more extensive damage may require partial or full replacement of the affected boards.
Gutter Maintenance
Examine the gutters and downspouts attached to your fascia. Ensure they’re securely fastened and free from debris. Clogged or damaged gutters can lead to water overflow, potentially damaging your fascia and the underlying structure. Clean gutters regularly to prevent water accumulation and potential fascia damage.
Professional Assessment
Consider hiring a professional (such as a member of the Home Owners Association) for an annual inspection of your timber fascia. They can spot potential issues that might be missed by an untrained eye and provide expert advice on maintenance and repairs. This proactive approach can save you money in the long run by preventing major damage before it occurs.
Wrapping Up
Our timber fascia installation guide provides homeowners with the knowledge to enhance their home’s aesthetics and functionality. Proper installation of timber fascia shields your roof’s edge from water damage, prevents pest intrusion, and supports your guttering system. Regular maintenance, including cleaning, inspection, and resealing, will help your fascia withstand harsh weather conditions and maintain its structural integrity.
At Home Owners Association, we support homeowners in Melbourne, Australia, with their home improvement projects. Our expert advice and resources can guide you through every step of your timber fascia installation and maintenance. We offer access to trade pricing on materials and provide personalised guidance to ensure your home projects meet high-quality standards.
Understanding the process of timber fascia installation and maintenance is important for every homeowner. You protect your investment and ensure its longevity when you install and care for your timber fascia properly. (Our team stands ready to assist you with any questions or concerns you may have about your timber fascia project.)