
At Home Owners Association, we understand the appeal of timber windows for their classic charm and durability. Installing these windows correctly is essential for maximizing their benefits and longevity.
Our timber window installation guide will walk you through the process step-by-step, ensuring a successful project. Whether you’re a DIY enthusiast or considering professional help, this guide will provide valuable insights for your window upgrade.
Preparing Your Space for Timber Window Installation
At Home Owners Association, we know that proper preparation is the key to a successful timber window installation. This initial step lays the groundwork for the entire project, helping to minimize potential issues and streamline the process.
Assemble Your Toolkit
Start by gathering all the necessary tools and materials. Your toolkit should include:
- Tape measure
- Level
- Drill
- Screwdriver
- Pry bar
- Utility knife
- Caulking gun
- Safety gear (gloves and goggles)
For materials, you’ll need weatherproofing tape, insulation foam, shims, screws, and caulk. Having everything ready beforehand prevents frustrating mid-project interruptions.

Measure with Precision
Accurate measurements are essential for a perfect fit. Measure the width and height of your window opening at multiple points:
- Width: top, middle, and bottom
- Height: left, center, and right
Always use the smallest measurement to ensure your new window fits snugly.
Remove Old Windows and Clean
To remove old windows:
- Score around the window frame with a utility knife to break the paint seal.
- Use a pry bar to carefully remove interior trim.
- Unscrew or pry out the old window.
Once removed, clean the opening thoroughly. Remove all debris, old caulk, and loose paint. A clean surface ensures proper adhesion and sealing of the new window.
Inspect for Structural Issues
While the opening is exposed, check for signs of water damage, rot, or structural problems. Address these issues before proceeding with installation. Fixing these problems now prevents costly repairs later and ensures optimal performance of your new timber windows.
Prepare the Opening
After inspection and cleaning, prepare the opening for the new window:
- Apply a water-resistant barrier around the opening.
- Install flashing at the bottom of the opening.
- Create a level surface using shims if necessary.
This preparation ensures a watertight seal and proper window alignment.
With your space meticulously prepared, you’re ready to move on to the actual installation process. The next chapter will guide you through positioning and securing your new timber window, ensuring a professional-quality result.
How to Install a Timber Window: Step-by-Step Guide
Weatherproofing and Positioning
Start the installation process by applying weatherproofing tape around the window opening. This creates a barrier against moisture infiltration. With a partner, lift the window into the opening. Center it, leaving equal spacing on all sides. Use a level to check that the window is straight both vertically and horizontally. Adjust the position with cedar shims as needed.
Securing the Frame
After achieving the correct position, secure the window frame. Drill pilot holes through the frame into the rough opening. Use 3-inch screws, placing them about 6 inches from each corner and every 8 to 10 inches along the sides. Avoid overtightening the screws to prevent frame warping. Test the window’s operation to ensure smooth opening and closing after securing.

Insulation Application
Fill the gaps between the frame and the wall with low-expansion foam insulation. This step enhances energy efficiency, provides a moisture barrier, reduces noise, and improves overall comfort. Allow the foam to dry completely before trimming any excess. This insulation creates a tight seal, preventing drafts and improving the overall performance of your new timber window.
Interior and Exterior Finishing
Install the interior trim, taking care to miter the corners for a professional finish. On the exterior, apply a high-quality caulk around the window’s perimeter. This creates a watertight seal (essential for protecting against water infiltration). The caulk also provides a neat, finished appearance to your newly installed window.
Professional Installation Considerations
While many homeowners successfully install timber windows themselves, complex projects often benefit from professional expertise. Larger windows or intricate designs may require specialized skills and tools. Professional installers can ensure flawless installation and often provide warranties on their work.
The next section will cover the finishing touches that protect your investment and maintain the beauty of your new timber windows for years to come. These final steps are essential for maximizing the longevity and performance of your newly installed windows.
Perfecting Your Timber Window Installation
Sealing for Protection
The first step in finishing your timber window installation is thorough sealing. Apply a high-quality exterior caulk around the entire perimeter of the window, both inside and out. This creates a watertight barrier that prevents moisture infiltration (which can lead to rot and decay). Pay special attention to the joints between the window frame and the house siding, as these are common entry points for water.
For the best results, choose a caulk specifically designed for exterior use on wood. Silicone caulk is renowned for its flexibility, weather resistance, and durability, making it an excellent choice for sealing areas around windows. Apply the caulk in a smooth, continuous bead, and use a caulking tool or your finger (wetted with soapy water) to create a neat finish.
Finishing for Beauty and Durability
Once the caulk has dried, apply a protective finish to your timber window. This step preserves the wood and enhances its natural beauty. You have two main options: paint or stain.
If you choose to paint, start with a high-quality exterior primer designed for wood. This helps the paint adhere better and provides an additional layer of protection. Follow with at least two coats of exterior-grade paint, allowing each coat to dry completely before applying the next.
For a more natural look, opt for a stain and sealer combination. These products penetrate the wood, highlighting its grain while providing protection against UV rays and moisture. Apply at least two coats, following the manufacturer’s instructions for drying times between applications.
Whichever finish you choose, treat all surfaces of the window, including the top and bottom edges. These often-overlooked areas are particularly vulnerable to moisture absorption.
Maintaining Your Timber Windows
Regular maintenance preserves the beauty and functionality of your timber windows. Here’s a simple maintenance routine:
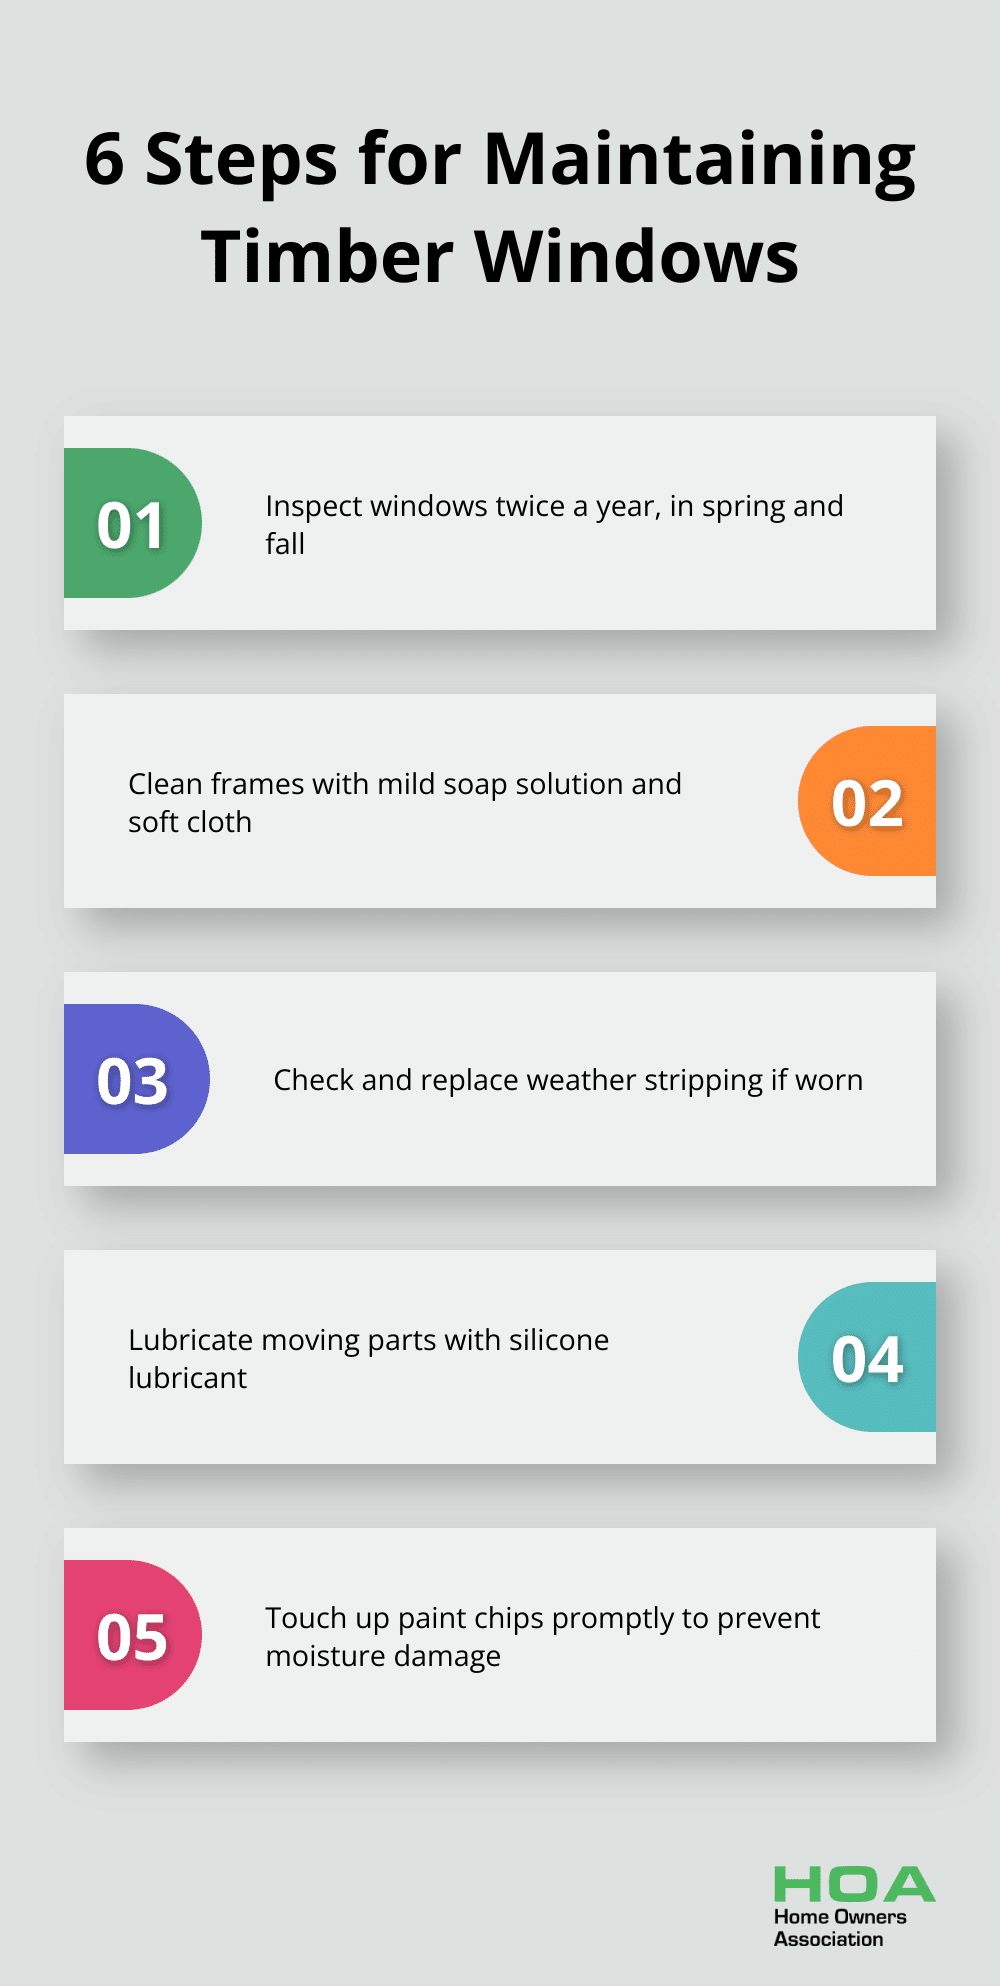
- Inspect your windows twice a year, ideally in spring and fall. Look for signs of wear, peeling paint, or gaps in the caulking.
- Clean the windows and frames with a mild soap solution and a soft cloth. Avoid abrasive cleaners or tools that could damage the finish.
- Check the weather stripping and replace it if it shows signs of wear or damage. This simple step can significantly improve your window’s energy efficiency.
- Lubricate moving parts, such as hinges and locks, with a silicone lubricant to ensure smooth operation. This is suitable for surfaces made from wood, rubber, plastic, or most other materials that require lubrication.
- Touch up any chips or scratches in the paint or stain promptly to prevent moisture from penetrating the wood.
- Reapply caulk as needed, typically every 3-5 years, depending on your climate and the quality of the initial application.
Professional Maintenance Services
While many homeowners can handle basic maintenance tasks, some may prefer professional assistance. Home Owners Association offers expert advice and resources to ensure that all projects meet the highest standards of quality. Our personalized guidance helps members make informed decisions throughout their home improvement journeys, including timber window maintenance and exterior transformations.
Final Thoughts
Our timber window installation guide provides homeowners with the knowledge to enhance their property’s aesthetics and functionality. Properly installed timber windows offer excellent insulation, reduce energy costs, and add character to your home. These windows will perform well and look beautiful for decades with regular maintenance.
Home Owners Association supports Melbourne homeowners through every stage of their home improvement journey. Our members access trade pricing, expert advice, and resources to ensure their projects meet the highest standards. We help you make informed decisions and achieve outstanding results for your renovations.
Professional expertise often benefits complex installations, especially for large windows, unusual shapes, or heritage properties. Home Owners Association can connect you with skilled professionals who ensure flawless installation (often with valuable warranties). The timeless beauty of timber windows awaits you, whether you choose DIY or professional installation.