At Home Owners Association, we understand the critical role of tile waterproofing in maintaining beautiful and durable surfaces in your home.
Water damage and mould growth can quickly turn your pristine tiled areas into costly nightmares. That’s why we’ve created this comprehensive guide to help you protect your investment and keep your tiles looking their best for years to come.
Learn the essential steps, common pitfalls to avoid, and expert tips for effective tile waterproofing.
Why Waterproof Your Tiles?
The Hidden Dangers of Water Damage
Water damage acts as a silent destroyer. It penetrates through grout lines and microscopic pores in tiles, causing unseen havoc beneath the surface. About one in 60 insured homes has a property damage claim caused by water damage or freezing. Waterproofing your home creates a barrier that stops moisture from infiltrating deeper into your home’s structure.
Mould: More Than Just an Eyesore
Mould thrives in damp environments, and untreated tile surfaces provide prime real estate for these harmful organisms. The Centers for Disease Control and Prevention (CDC) warns that mould exposure can cause various health issues (from allergic reactions to more severe respiratory problems). Proper waterproofing significantly reduces mould growth risk, which protects both your home and your health.
Longevity: A Smart Investment
Waterproofing proves to be an investment that pays off. Vinyl floors can last up to 50 years, while linoleum lasts about 25 years. In contrast, non-waterproofed tiles in moisture-prone areas may require replacement in as little as 10-15 years. This means the initial cost of waterproofing can save you thousands in the long run.
Preserving Aesthetic Appeal
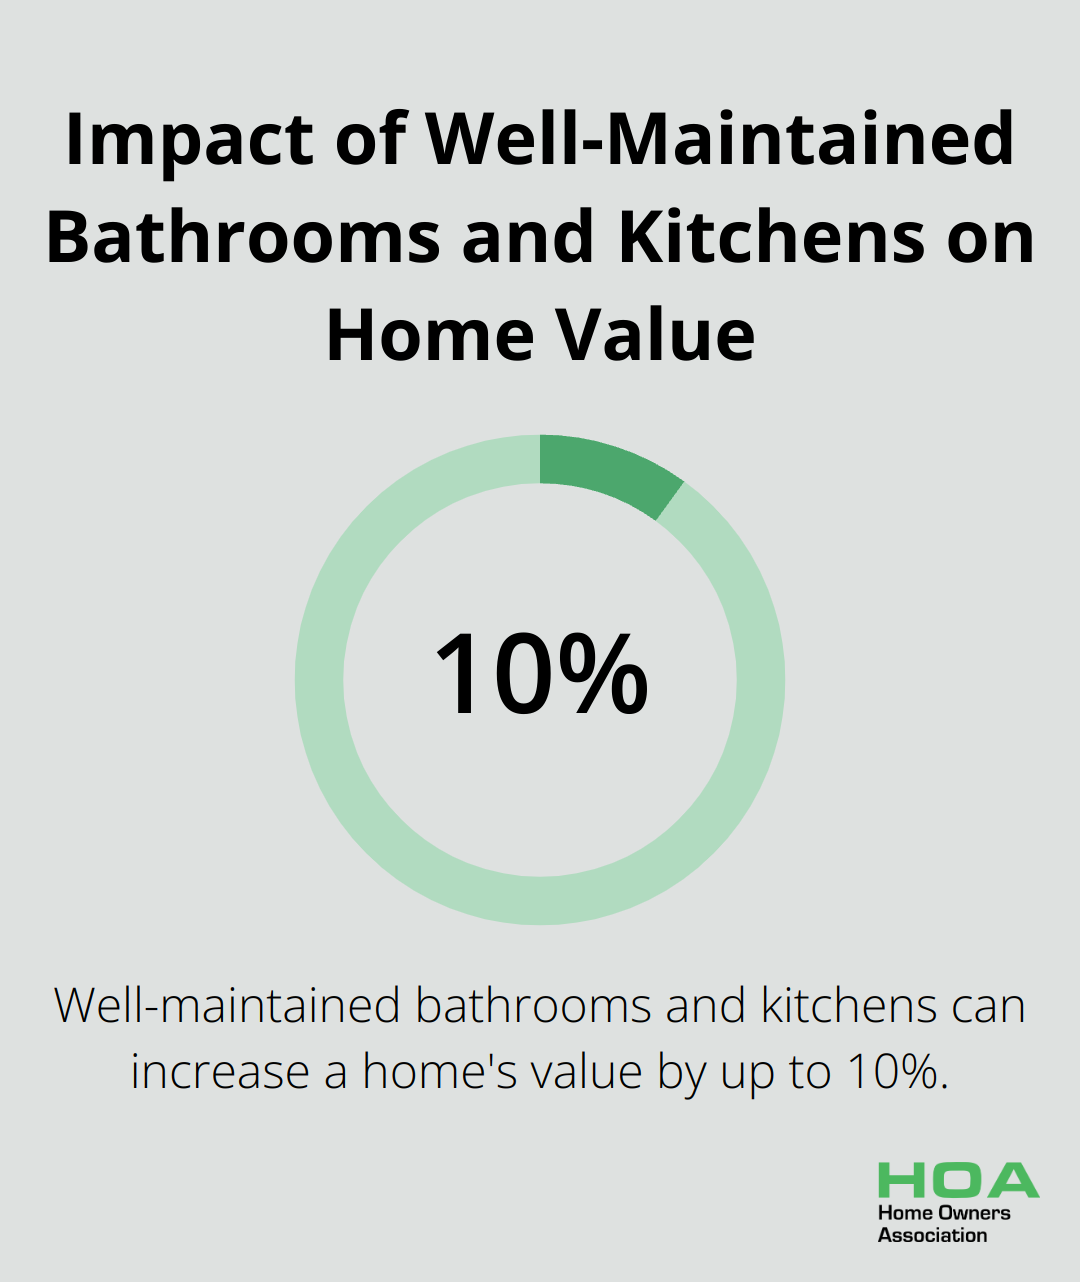
Nothing diminishes the beauty of tiled surfaces faster than water stains, efflorescence, or mould growth. These issues not only look unsightly but can also decrease your property value. A survey by the National Association of Realtors found that well-maintained bathrooms and kitchens can increase a home’s value by up to 10%. Waterproofing helps maintain that pristine look, which ensures your tiles remain a highlight of your home for years to come.
Cost-Effective Prevention
The cost of waterproofing tiles pales in comparison to the potential expenses of water damage repair. According to industry experts, the average cost of water damage restoration ranges from $2,000 to $5,000 (depending on the extent of the damage). Waterproofing serves as a preventive measure that can save homeowners significant amounts of money and stress in the long term.
As we move forward, let’s explore the essential steps for effective tile waterproofing to ensure your home remains protected and beautiful for years to come.
Waterproofing Tiles Step by Step
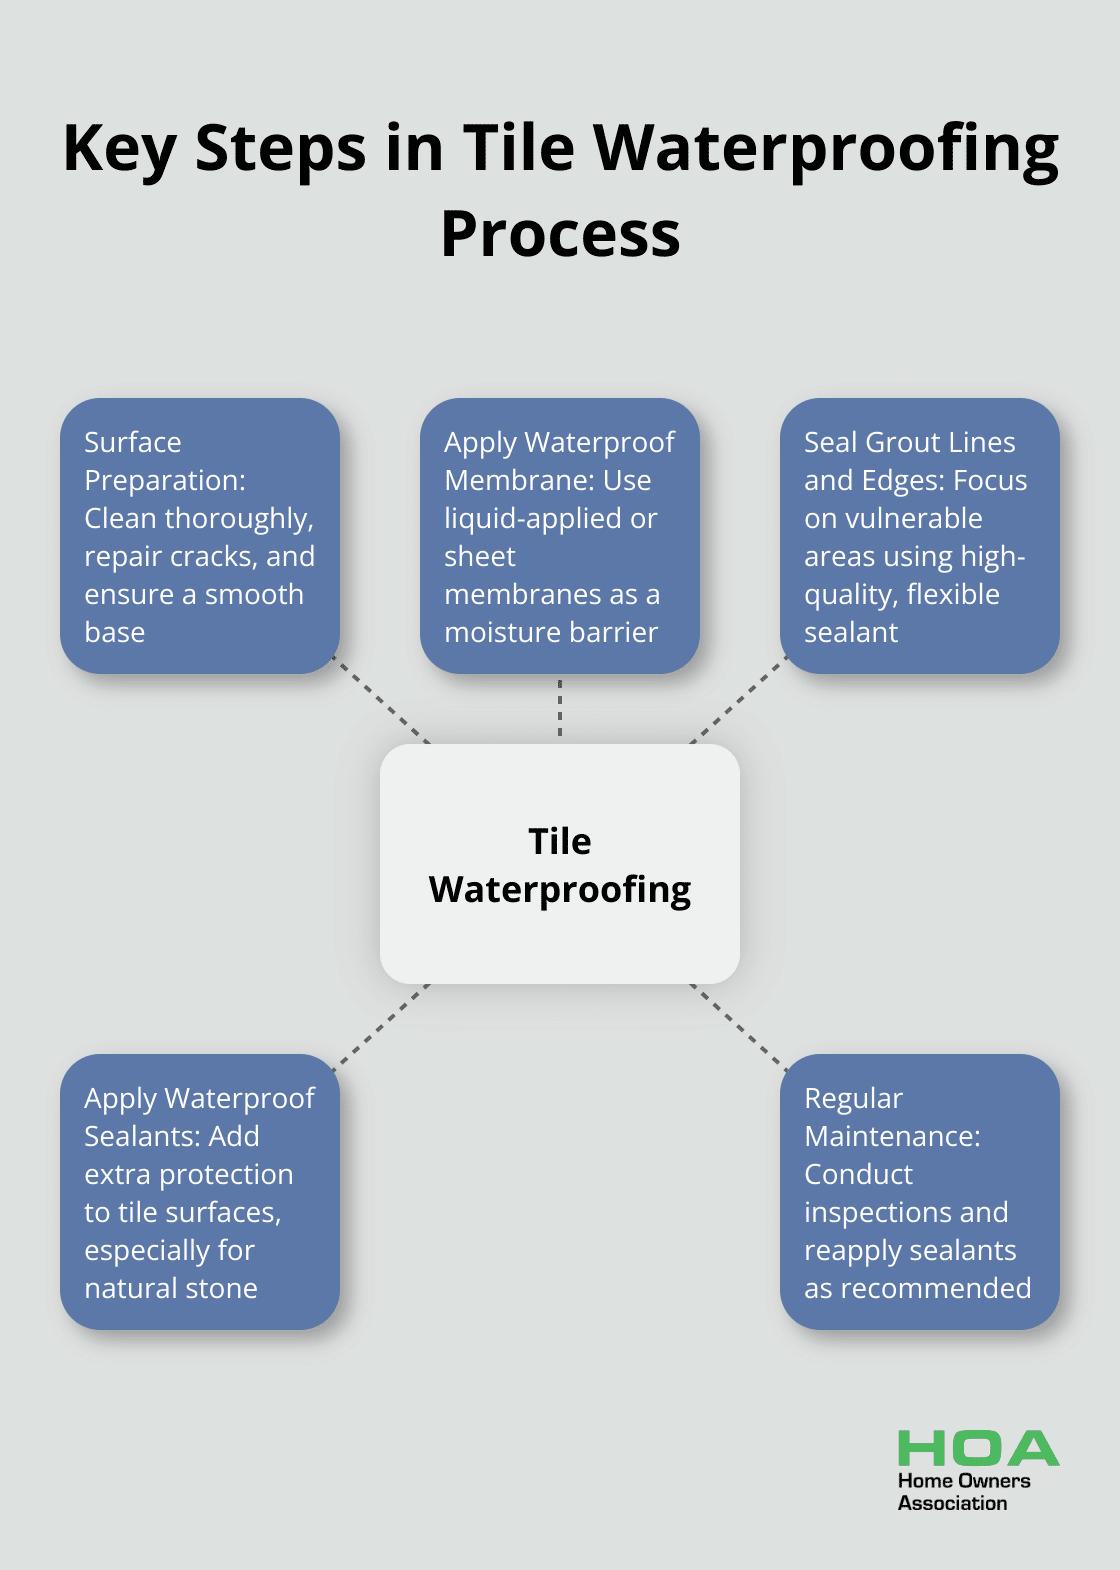
Surface Preparation: The Foundation of Success
Successful waterproofing begins long before product application. First, clean the surface thoroughly. Remove all dirt, dust, and debris. Use a degreaser if necessary to ensure a pristine base. Next, repair any cracks or imperfections in the substrate. Even tiny fissures can compromise your waterproofing efforts.
For concrete surfaces, grinding may be necessary to create a smooth, even base. Wood substrates might require reinforcement with cement board to prevent warping. The Tile Council of North America reports that proper substrate preparation can prevent up to 80% of tile installation failures.
Applying the Waterproof Membrane: Your First Line of Defence
After surface preparation, apply a waterproof membrane. This layer acts as a barrier against moisture infiltration. Two main types of membranes exist: liquid-applied and sheet membranes.
Liquid-applied membranes are popular for their ease of use and ability to conform to irregular surfaces. Apply the membrane with a roller or brush, ensuring complete coverage. Most professionals recommend at least two coats for optimal protection.
Sheet membranes, while more challenging to install, provide uniform thickness and are ideal for large, flat areas. Pay careful attention to seams when using sheet membranes.
Sealing Grout Lines and Edges
After your membrane has cured (following manufacturer guidelines for drying times), focus on sealing grout lines and edges. These areas are particularly vulnerable to water penetration.
Use a high-quality, flexible sealant designed for wet areas. Pay extra attention to corners, joints, and any spots where different materials meet. The National Tile Contractors Association emphasizes that proper sealing of these transition points can prevent up to 90% of water-related tile failures.
For added protection, consider using epoxy grout. While more expensive than traditional cement-based grouts, epoxy offers superior water resistance and durability.
Waterproof Sealants for Tile Surfaces
Even with a membrane and sealed grout lines, applying a waterproof sealant to your tile surfaces provides an extra layer of protection. This step is particularly important for natural stone tiles, which are more porous than ceramic or porcelain.
Choose a penetrating sealer for unglazed tiles and natural stone. For glazed tiles, a surface sealer can add an extra barrier against stains and moisture. Apply the sealant evenly, following the manufacturer’s instructions for application and reapplication schedules.
Industry experts recommend resealing natural stone tiles annually, while ceramic and porcelain tiles may only need resealing every 3-5 years.
Now that we’ve covered the essential steps for waterproofing your tiles, let’s explore some common mistakes to avoid in this process. These pitfalls can undermine even the most careful waterproofing efforts, so it’s important to be aware of them.
Avoiding Common Waterproofing Mistakes
Waterproofing tiles requires attention to detail and careful execution. We at Home Owners Association have observed numerous waterproofing projects fail due to simple oversights. This chapter explores the most frequent mistakes and provides guidance on how to avoid them.
Inadequate Surface Preparation
The foundation of successful tile waterproofing lies in thorough surface preparation. Some common issues with substrate preparation can lead to uneven tile installation, cracks, and eventual tile failure. To avoid this pitfall:
- Clean the substrate meticulously, removing all dust, grease, and loose particles.
- Repair cracks and level uneven areas before applying waterproofing materials.
- For concrete surfaces, use a moisture meter to confirm the substrate is sufficiently dry (this step is often overlooked but can prevent future issues).
Insufficient Waterproofing Material Application
Applying too little waterproofing material compromises the entire system. To ensure adequate coverage:
- Follow manufacturer guidelines for coverage rates and thickness (these specifications are not mere suggestions but essential requirements).
- Apply multiple thin coats rather than one thick layer for better adhesion and coverage.
- Don’t skimp on material in hard-to-reach areas or corners, as these spots often need extra protection.
Disregarding Proper Curing Times
Impatience during the waterproofing process can lead to system failure. To avoid this mistake:
- Adhere strictly to the manufacturer’s recommended curing times (even if it delays your project).
- Factor in environmental conditions like humidity and temperature, which can affect drying times.
- Resist the urge to tile or apply additional coats before the previous layer has fully cured.
Overlooking Long-Term Maintenance
Waterproofing is not a one-time task. Even the best systems degrade over time without proper care. To maintain the integrity of your waterproofing:
- Conduct regular inspections (at least annually) to check for signs of wear or damage.
- Reseal grout lines every 12-18 months in high-moisture areas.
- For natural stone tiles, reapply a penetrating sealer annually (this simple step can significantly extend the life of your waterproofing).
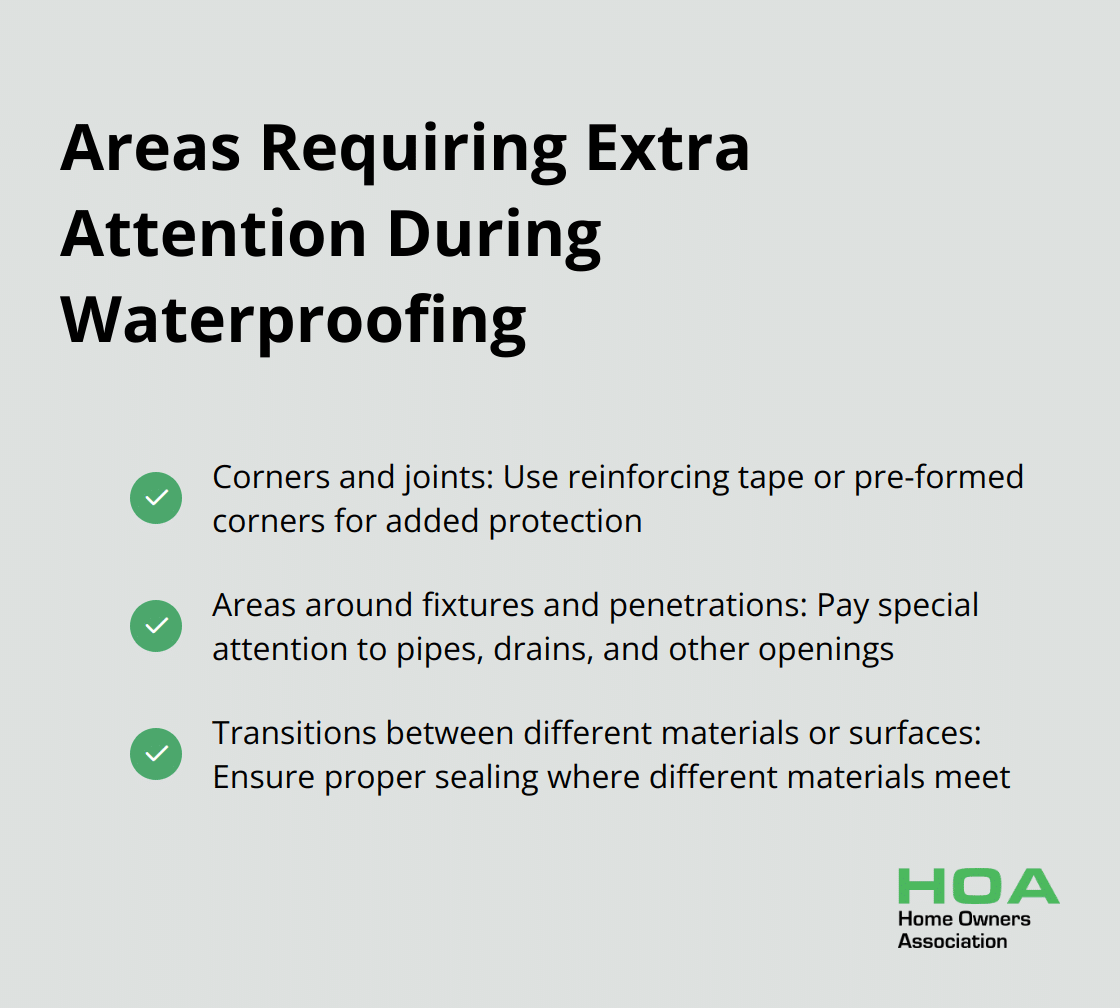
Neglecting Problem Areas
Certain areas require extra attention during the waterproofing process. Failing to water infiltration. Pay special attention to:
Final Thoughts
Tile waterproofing protects your home from water damage, mould growth, and costly repairs. Proper surface preparation and careful application of waterproof membranes create a robust barrier against moisture intrusion. The long-term benefits include enhanced durability, maintained aesthetic appeal, and a healthier living environment.
Regular maintenance ensures lasting protection for your waterproofing system. Annual inspections, prompt repairs, and reapplication of sealants (as recommended by manufacturers) will maximise the lifespan of your tiled surfaces. This ongoing care keeps your tiles looking pristine for years to come.
Home Owners Association helps Melbourne homeowners make informed decisions about property maintenance and improvement projects. Our members receive trade pricing, expert advice, and resources to ensure their home projects meet the highest standards. We support you in protecting your investment and creating a beautiful, durable living space.