At Home Owners Association, we understand the importance of protecting your property from water damage. Epoxy waterproofing is a powerful solution that can safeguard various surfaces in your home.
This guide will walk you through the process of applying epoxy waterproofing, from surface preparation to the final coat. We’ll share expert tips and techniques to help you achieve a durable, water-resistant finish that lasts for years.
What Is Epoxy Waterproofing?
The Science of Epoxy
Epoxy waterproofing is a powerful method to protect surfaces from water damage. This technique uses a specialised epoxy coating to create a water-resistant barrier. Epoxy consists of two parts: resin and hardener. When mixed, these components react chemically to form a tough, impermeable surface (perfect for waterproofing various areas in your home). Epoxy resin coatings have excellent mechanical strength and adhesion to many kinds of surfaces. They are corrosion resistant and resistant to many chemicals.
Advantages of Epoxy Waterproofing
Epoxy waterproofing offers several benefits over traditional methods:
- Durability: High-quality coatings ensure that structures not only look great but also stand strong against the tests of time and nature.
- Chemical Resistance: Epoxy withstands harsh cleaning agents and other potentially damaging substances.
- Versatility: It can be applied to various surfaces, including concrete, metal, and wood.
Suitable Surfaces for Epoxy Application
Epoxy waterproofing works well on many surfaces:
- Concrete floors in basements and garages
- Bathroom walls and floors
- Kitchen benchtops and backsplashes
- Outdoor decks and patios

The Application Process
Applying epoxy waterproofing requires careful preparation and execution:
- Surface Preparation: Clean the surface thoroughly and repair any existing damage.
- Priming: Apply a primer to ensure proper adhesion of the epoxy coating.
- Epoxy Application: Apply multiple layers to achieve optimal waterproofing results.
- Curing: Allow the epoxy to cure fully (this process can take 24-72 hours depending on the product and conditions).
Maintenance and Care
While epoxy waterproofing is low-maintenance, proper care can extend its lifespan:
- Clean regularly with non-abrasive tools and cleaners
- Inspect the surface periodically for signs of wear or damage
- Address any issues promptly to maintain the integrity of the waterproof barrier
Epoxy waterproofing provides a robust solution for protecting your surfaces from water damage. As we move forward, we’ll explore the essential steps to prepare your surface for epoxy application, ensuring the best possible results for your waterproofing project.
How to Prepare Surfaces for Epoxy Waterproofing
Proper surface preparation forms the bedrock of successful epoxy waterproofing. This step can make or break your project, so it’s essential to give it the attention it deserves. Let’s walk through the key steps to get your surfaces ready for epoxy application.
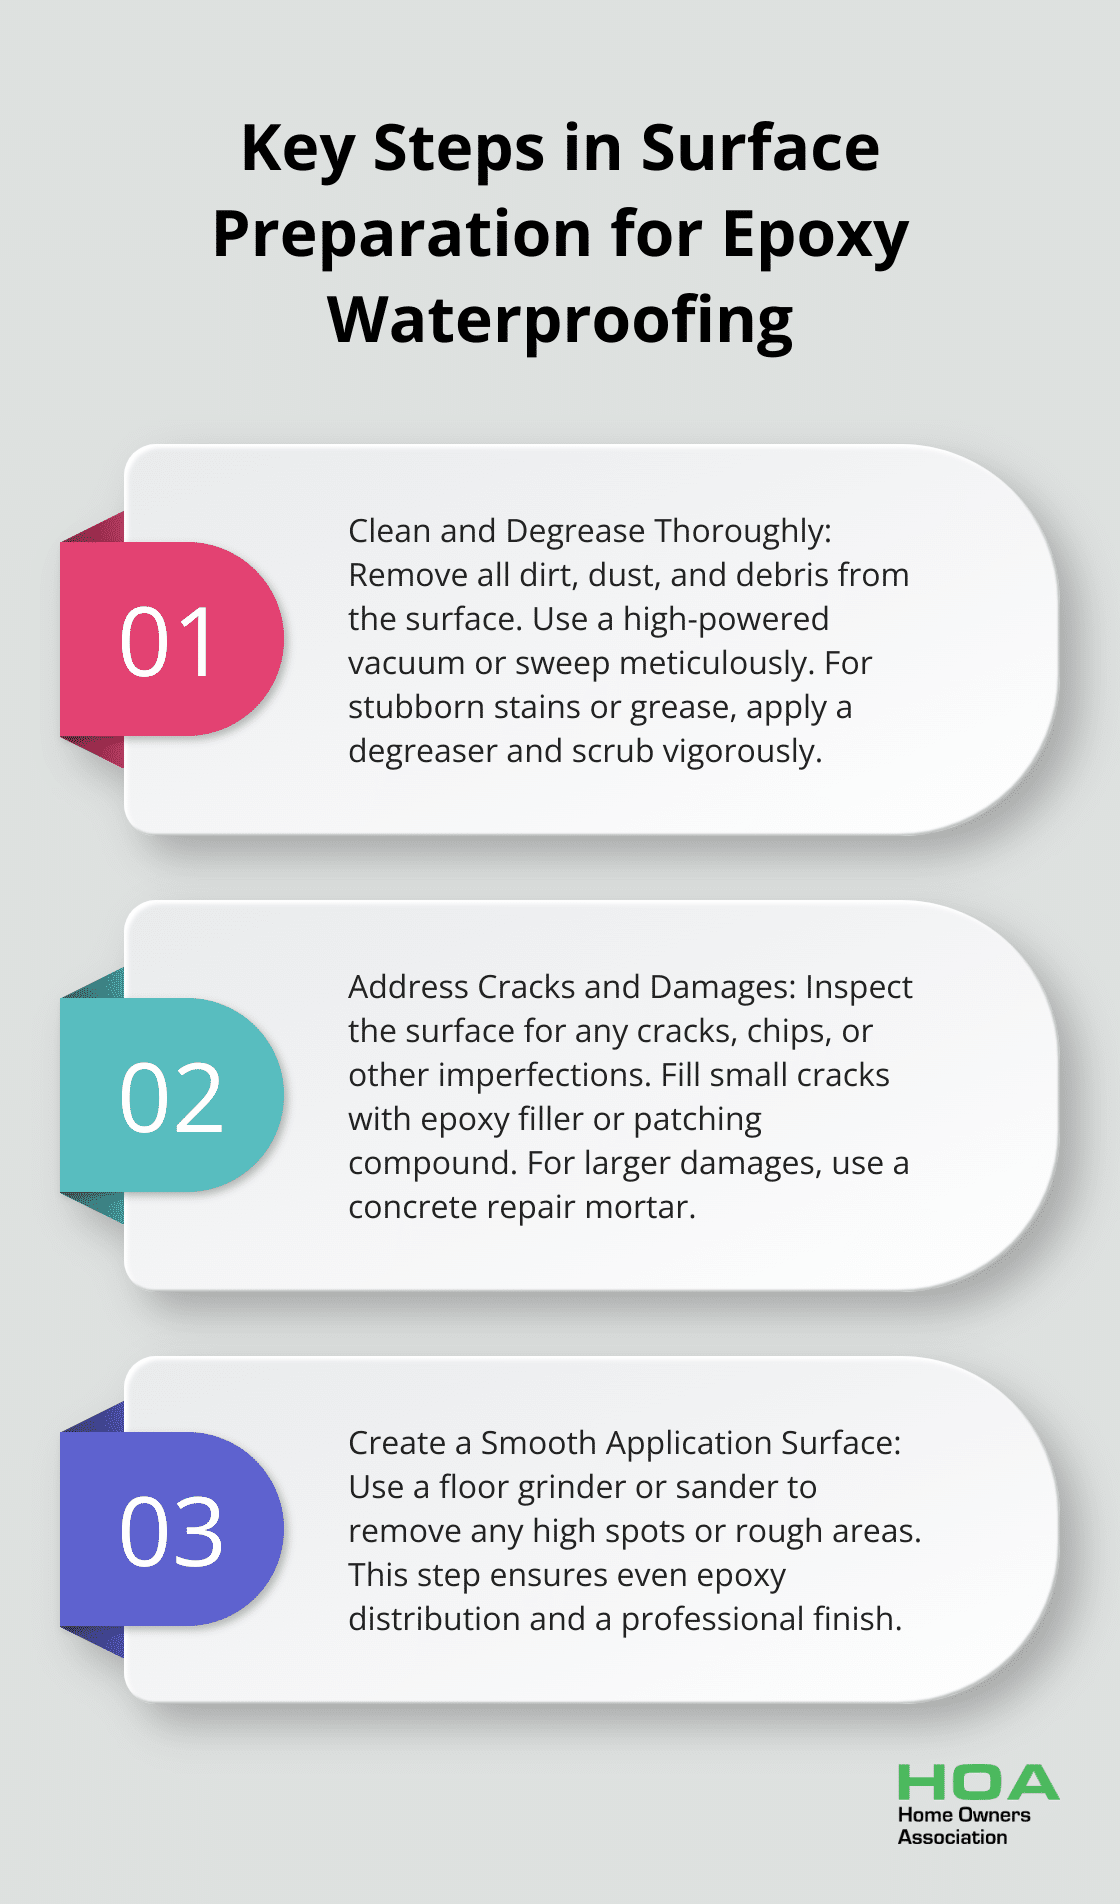
Clean and Degrease Thoroughly
Start by removing all dirt, dust, and debris from the surface. Use a high-powered vacuum or sweep meticulously. For stubborn stains or grease, apply a degreaser and scrub vigorously. Rinse the area multiple times with clean water to ensure no residue remains. Allow the surface to dry completely before proceeding.
For concrete surfaces, consider acid etching. This process opens up the pores of the concrete, allowing for better epoxy adhesion. A 10% acid solution is suitable for etching concrete, which means mixing one part acid to nine parts water. Always add the acid to the water, not the other way around. However, exercise caution – acid etching requires proper safety equipment and careful handling.
Address Cracks and Damages
Inspect the surface for any cracks, chips, or other imperfections. Fill small cracks with epoxy filler or patching compound. Epoxy-based fillers are best for structural repair and compatibility with epoxy coatings. For larger damages, you might need to use a concrete repair mortar. Apply the filler material, smooth it out, and allow it to cure fully before moving forward.
Don’t overlook seemingly minor imperfections. Even small cracks can compromise the waterproof barrier if left untreated.
Create a Smooth Application Surface
After repairs, focus on creating a smooth, even surface. Use a floor grinder or sander to remove any high spots or rough areas. This step is particularly important for concrete floors, as it helps ensure even epoxy distribution and a professional finish.
For vertical surfaces like walls, sand by hand or with an orbital sander if necessary. Try to achieve a surface that feels smooth to the touch, with no noticeable bumps or dips.
Once you complete these steps, perform a final cleaning to remove any dust created during the smoothing process. Use a tack cloth to pick up the finest particles.
The time invested in surface preparation pays off in the longevity and effectiveness of your epoxy waterproofing. Rushing through these steps can lead to poor adhesion, bubbling, or premature failure of the epoxy coating (outcomes we want to avoid at all costs).
Now that your surface is properly prepared, you’re ready to move on to the exciting part – applying the epoxy waterproofing. In the next section, we’ll guide you through the application process step by step, ensuring you achieve a professional-grade finish.
How to Apply Epoxy Waterproofing
Mixing the Epoxy
Start by measuring the epoxy resin and hardener according to the manufacturer’s instructions. The ratio is typically 2:1 or 3:1, but always double-check. Mix thoroughly for 3-5 minutes until no streaks remain. Once mixed, you have a limited working time (usually 30-40 minutes), so plan accordingly.
Priming the Surface
Apply a thin layer of epoxy primer with a roller or brush. This step improves adhesion and prevents air bubbles. Allow the primer to become tacky but not fully dry before proceeding (this usually takes about 30 minutes to an hour, depending on temperature and humidity).
Applying the Main Epoxy Layers
Pour the mixed epoxy onto the surface in small amounts. Use a notched squeegee to spread it evenly, then go over it with a roller to remove any lines or ridges. Apply at least two coats, waiting 12-24 hours between each. For maximum waterproofing, some professionals recommend up to four coats.
Adding Non-Slip Additives
If you waterproof a floor or other surface that might get wet, consider adding non-slip additives. Sprinkle these over the wet epoxy after the final coat, then lightly roll to embed them. Popular options include silica sand or aluminium oxide (which provide excellent traction without compromising the waterproof seal).
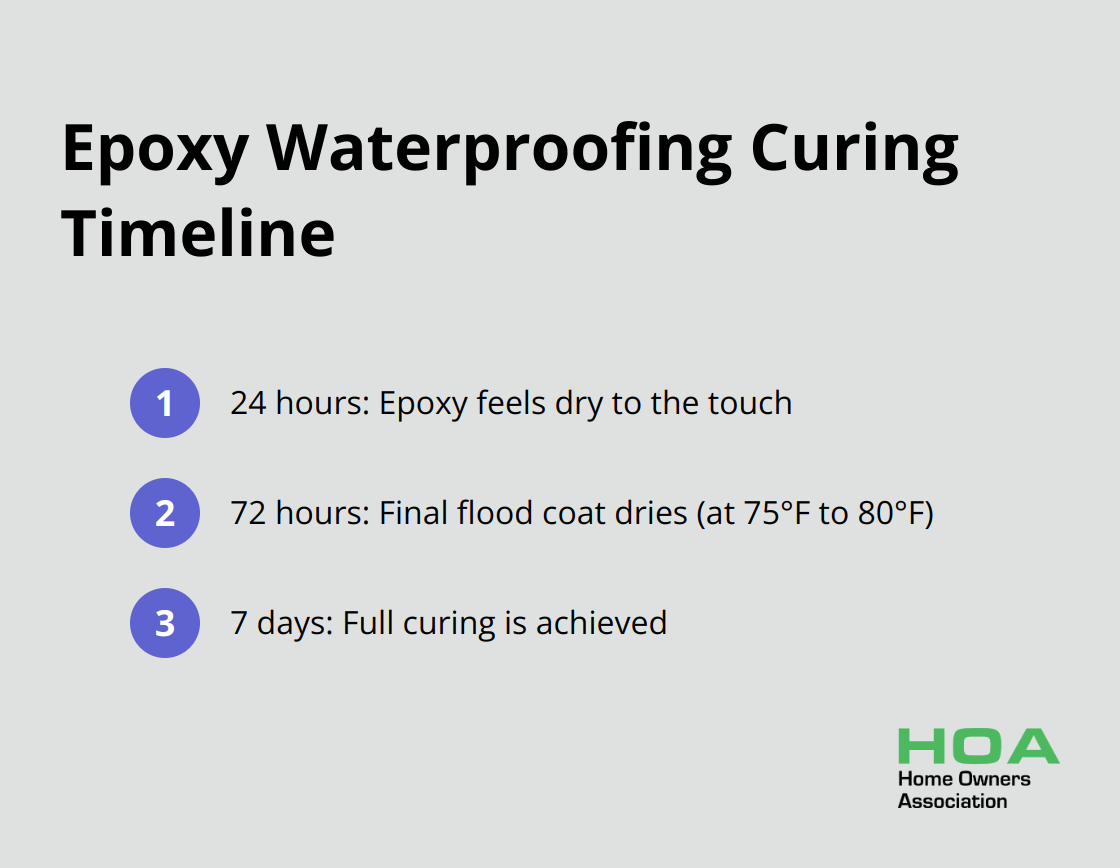
Curing and Drying
Epoxy needs time to cure properly. While it might feel dry to the touch after 24 hours, full curing can take up to 7 days. The drying time for the final flood coat of epoxy is 72 hours, presuming you’ve maintained the recommended temperature range of 75°F to 80°F. During this time, avoid heavy traffic or placing objects on the surface.
These steps will help ensure a successful epoxy waterproofing project. If you’re unsure about any part of the process, don’t hesitate to consult with professionals. Home Owners Association is always ready to provide guidance or connect you with trusted experts in your area.
Final Thoughts
Epoxy waterproofing protects surfaces from water damage through careful preparation, precise application, and proper curing. This powerful solution creates a durable, water-resistant barrier that safeguards your property for years. The process requires attention to detail, from thorough surface preparation to accurate mixing and layering of epoxy coats.
Epoxy waterproofing offers exceptional durability, chemical resistance, and versatility for various surfaces in your home. It effectively protects basement floors, bathroom walls, and other areas prone to moisture exposure. The application process demands care and patience, but the long-lasting results justify the effort.
At Home Owners Association, we help Melbourne homeowners make informed decisions about property maintenance and improvement projects. Our members receive trade pricing, expert advice, and ongoing support for all home-related needs (including epoxy waterproofing). We stand ready to ensure your success in any home project you undertake.